Welcome
Royal Stock Register replaces the paper stock sheet with a live system that Royal's own staff and Royal's suppliers can both see at the same time. When stock is updated in the office, suppliers see the new numbers immediately — no more phone calls to check what's in.
There are two separate places to sign in, depending on who you are:
Some of the features described in this guide may not be switched on for your business yet — Royal turns on new capabilities gradually. If something described here isn't showing up on your screen, ask your system administrator whether it's been enabled (see Turning features on or off).
Getting Started
You'll never be given a password directly. When Royal sets up your account — whether you're a new staff member or a new supplier contact — the system emails you a link to choose your own password. Nobody, including Royal's administrators, can see or set it for you.
sign in for the first time
- Look for an email from Royal Stock Register with a subject like "Reset your password" — this is your welcome link, not a mistake.
- Click the link and choose a password.
- Go to the correct sign-in page for you:
- Office staff:
/office/login - Suppliers:
/login
- Office staff:
- Enter your email and the password you just chose.
Forgotten your password? Click "Forgot password" on your sign-in page and a new reset link will be emailed to you, the same way as your very first login.
For Royal Office Staff
Everything you need to run the day-to-day stock register, manage suppliers, and process orders.
Your Dashboard
After you sign in, you land on your Dashboard — a quick-glance summary of the whole register:
- Five headline numbers: how many products are listed, total units in stock, how many are running low, how many are completely out, and how many active suppliers you have.
- Needs attention: the 8 products lowest on stock right now, so you know what to reorder first.
- Recent stock imports: the last 5 bulk stock uploads, who did them, and whether they've been applied yet.
Everyone in the office — Staff, Admin, and Super Admin — sees this same dashboard.
Executive Overview
Managers and owners (Admin and Super Admin accounts) have an extra page, Executive Overview, with a deeper view:
- Four KPI cards, including how total stock has moved over the last 30 days (▲ up or ▼ down).
- A stock trend chart showing the register's total unit count over time — useful for spotting whether stock is generally growing or shrinking.
- A combined activity feed of recent imports and manual stock edits, so you can see at a glance who changed what.
If you're logged in as regular Staff, this page isn't in your menu — that's expected, not an error.

Products & Stock
The Products page is the heart of the system — it's exactly what suppliers see on their register, so anything you change here is visible to them right away.
Every product tracks stock in three columns, matching the paper register you already know: STD (standard), ECO (economy), and G&A (grade A). The Total is always just those three added together.
Finding a product
On the Products page, use the search box to type a product or category name, or narrow the list with the group, category, and stock (In stock / Low stock / Out of stock) dropdowns, then click Filter. Click Clear to reset.
add a new product
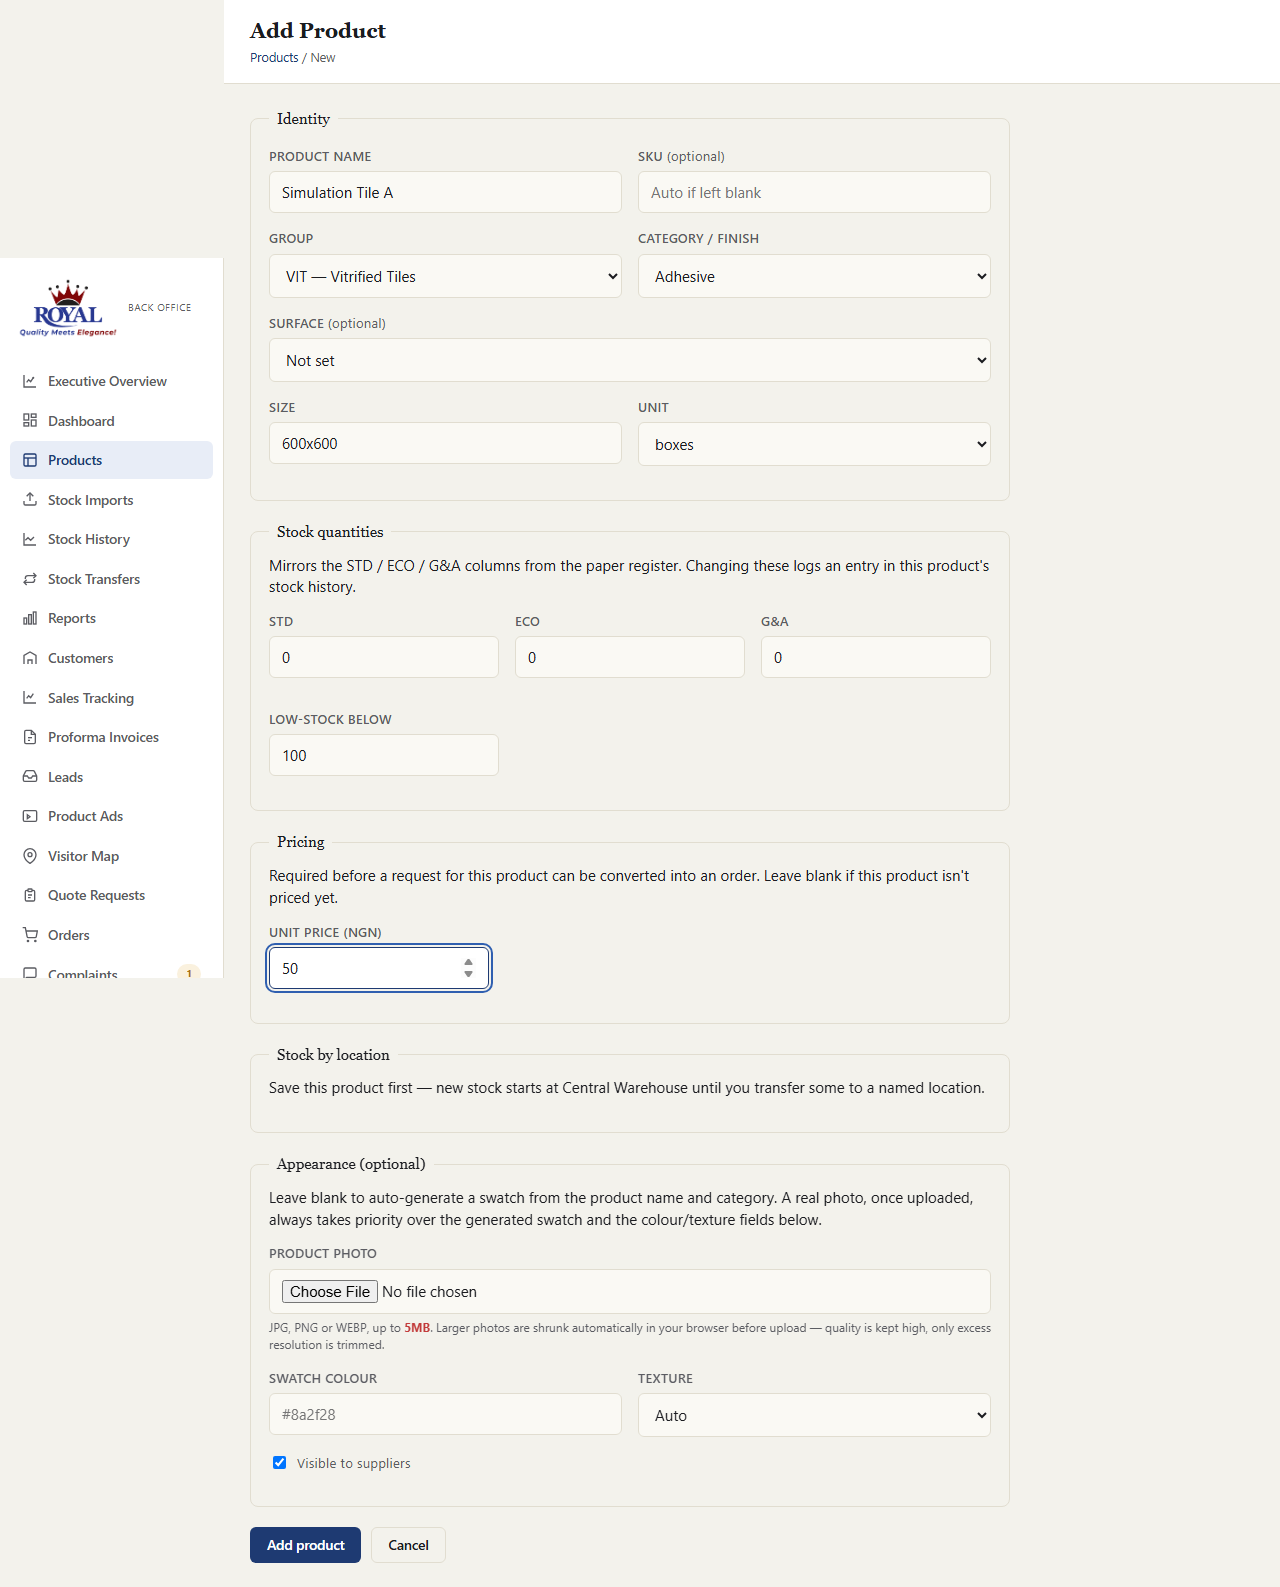
- From the Products page, click + Add product in the top right.
- Fill in the Identity section:
- Product name — required.
- SKU — optional; leave blank and one is generated automatically.
- Group and Category / finish — pick from the dropdowns.
- Size — e.g. "600x1200" or "25kg".
- Unit — boxes, pcs, bags, kg, or sqft.
- Fill in Stock quantities — starting counts for STD, ECO, and G&A, and how low the total should be allowed to drop before it's flagged as "Low-stock below" for this product specifically.
- If pricing is turned on for your account, optionally set a Unit price.
- Optionally set an Appearance — a swatch colour and texture (leave blank and one is generated automatically from the name/category), and tick or untick Visible to suppliers.
- Click Add product.
update a product's stock count
- Open the product from the Products list.
- Change the STD, ECO, and/or G&A numbers to the new counts.
- Click Save changes.
If your product's stock quantities look greyed out and read-only instead of editable boxes, it's because Warehouses & Showrooms is turned on for your account — see Warehouses & showrooms for how stock is edited in that mode.
Clearance & overstock
If Clearance Pricing is turned on, you can mark any product as on-sale: open the product, tick On clearance — show a discounted price to suppliers, and enter a Clearance price lower than the regular price. Suppliers then see that lower price instead of the normal one.
The Clearance page in the menu also shows overstock candidates — products sitting on more than three times their own low-stock level, worth considering for clearance even if nobody's flagged them yet. This list updates itself; you don't maintain it by hand.
Batch tracking & aging alerts batch_tracking
Flag specific products — typically ones that degrade with age, like cement or grout — and log when deliveries arrive, so aging stock doesn't get forgotten at the back of the warehouse.
turn on tracking for a product
- Open the product and tick Track batches for this product.
- Optionally set a Shelf life (days) — without this, batch dates are still logged, but nothing is ever flagged as aging on Reports.
- Click Save changes.
The Aging Stock report (under Reports) lists every tracked product's active batches, oldest and most urgent first, colour-coded OK / Aging / Expired based on the shelf life you set.
Batches aren't reconciled against a product's STD/ECO/G&A totals the way locations are — deliberately lightweight, for knowing what's getting old, not a guarantee every unit on hand is accounted for in a batch.
Categories & Product Groups
Every product belongs to one Group (e.g. a product line) and one Category (e.g. a finish type). These two screens — reached from the sidebar — let you add, rename, or reorder them. Groups have a sort order that controls which order their filter buttons appear in on both portals.
Warehouses & Showrooms
If your business stores stock in more than one place — a main warehouse plus one or more showrooms — turn on the Locations & Showrooms feature to track exactly how much of each product sits where.
There's always one location called Central Warehouse that you don't manage directly — it automatically shows whatever stock hasn't been specifically moved to a named location yet. If a product has 500 total units and you've only recorded 120 at your Downtown Showroom, Central Warehouse shows the other 380 without you doing anything. This can never get out of sync with the real total, because it's calculated fresh every time, not typed in by anyone.
set up a warehouse or showroom
- Go to Locations in the sidebar and click + Add location.
- Fill in:
- Name — e.g. "Downtown Showroom".
- Short code — e.g. "DTN".
- Type — Warehouse (stock storage) or Showroom (for viewing/collection).
- Phone and Address — optional.
- Sort order — controls the order locations are listed in.
- Click Add location.
The moment you submit a transfer, the quantity is taken off the "From" location's balance immediately, so it can't be double-counted or promised twice. But it does not land on the "To" location's balance yet — it sits "in transit" until someone at the receiving end confirms it actually arrived. Only then is it credited to "To". Nothing is ever recorded as received without someone actually confirming it.
move stock from one location to another
- Go to Stock Transfers in the sidebar and click + Transfer stock (or start from a product's page).
- Pick the Product, the From location, and the To location — these must be different.
- Enter how many STD, ECO, and/or G&A units are moving.
- Optionally add a note (e.g. "Delivery for showroom refresh").
- Click Initiate transfer.
confirm a transfer has arrived
- Go to Stock Transfers — anything awaiting confirmation is flagged at the top of the page and listed under In transit.
- Once the stock has physically arrived, click Confirm receipt on that row.
This two-step confirmation is the only way stock ever moves between locations, including into or out of Central Warehouse — which keeps a complete, honest trail of every move, with a name and timestamp attached to both the initiation and the confirmation.
That's a real warning, not a glitch — it means locations were collectively told about more stock than the product actually has on hand. Fix it with a transfer, or by correcting the count.
Deleting a location is safe — any stock recorded there simply reverts to showing at Central Warehouse, nothing is lost. Central Warehouse itself can be renamed, but it can never be deleted — and neither can In Transit, the system location that holds stock during the gap between initiating and confirming a transfer. You'll never pick In Transit directly; it only ever appears automatically while a transfer is pending.
Bulk Stock Uploads
If your stock counts come from a spreadsheet or an external system, you can upload the whole file instead of updating products one by one.
upload and apply a stock file
- Go to Stock Imports and click Upload.
- Choose your file (CSV, XLSX, or XLS, up to 5MB) and the date the report is for.
- The system shows you a preview before anything changes — each row is marked update (matches an existing product), create (a brand-new product), or skip (couldn't be read). Nothing is saved to the register yet.
- Check the preview looks right, then click Apply.
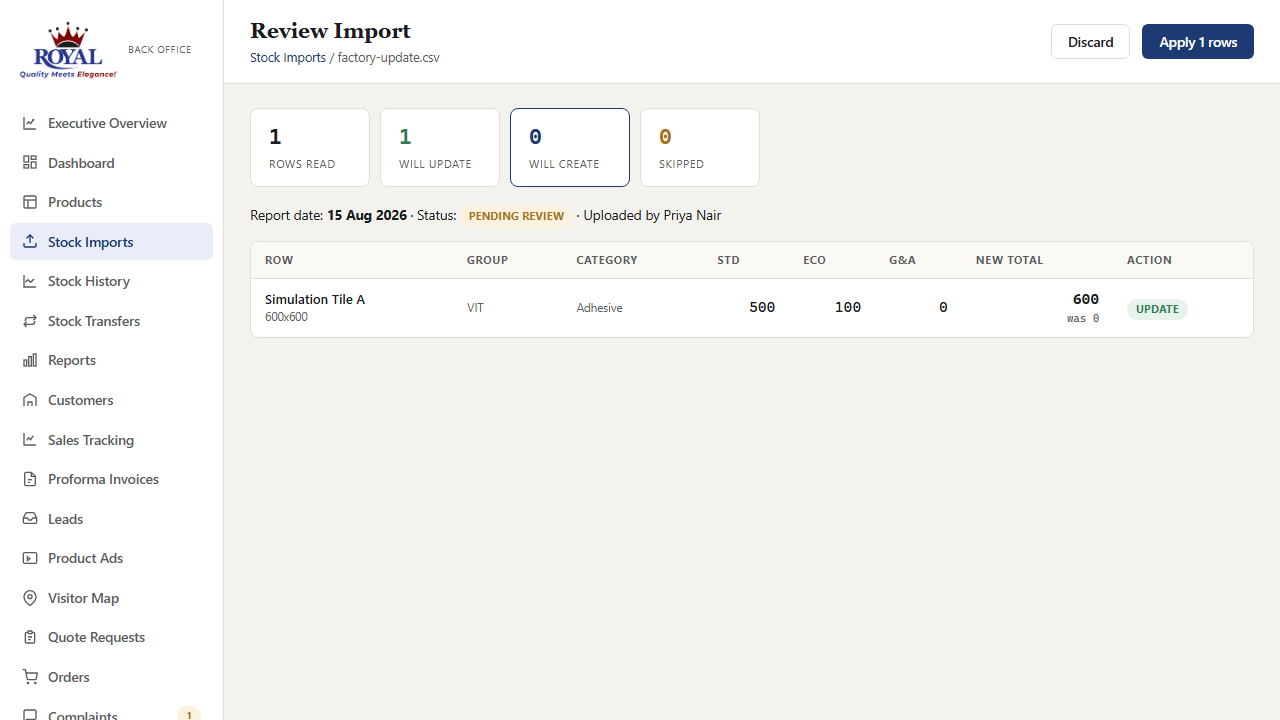
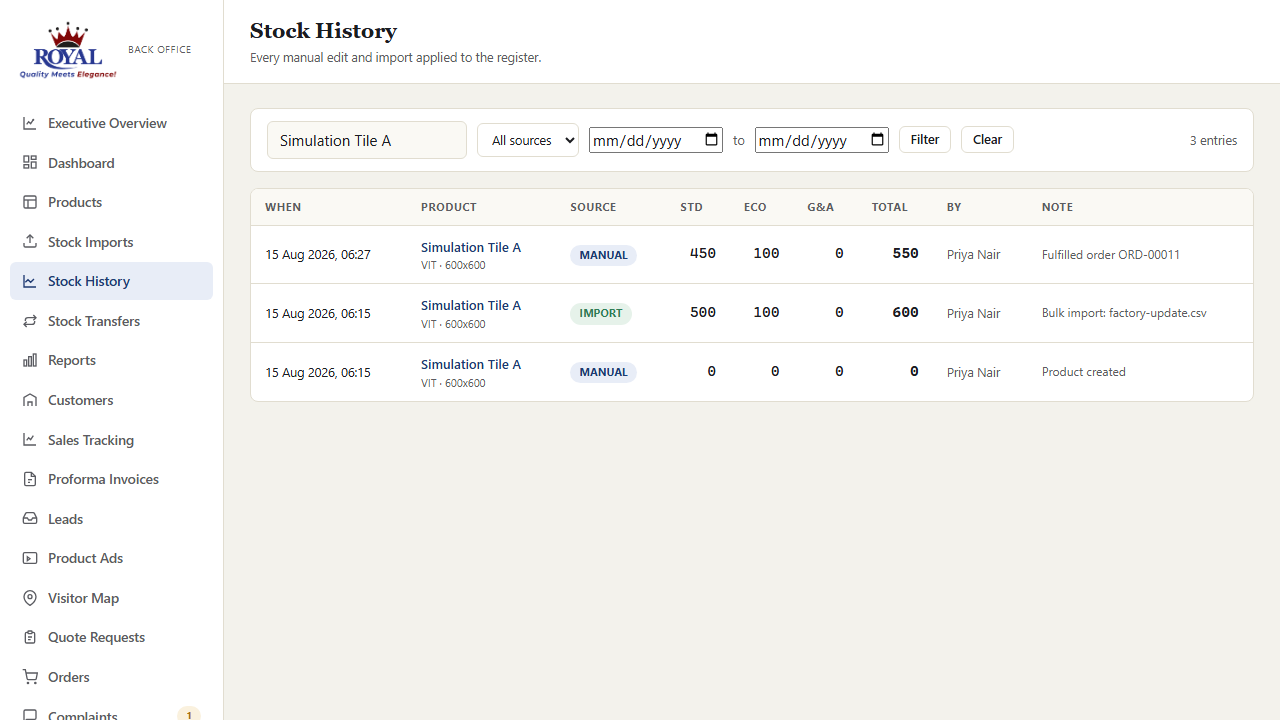
Whether a quantity was typed in by hand, came from a bulk upload, or was deducted by a fulfilled order, it all lands on the exact same STD/ECO/G&A fields — so the Products page, Stock History, the supplier portal, and any order all ever show that one real number. There's no separate copy of stock data anywhere in the system to fall out of sync.
Stock History
Every stock change ever made — whether typed in by hand, from a bulk upload, or deducted by a fulfilled order — is recorded here permanently, with who made it, when, and a note explaining what triggered it. Search by product name, filter by source or date range, or open a single product to see its quantity plotted over time.
Stock Shortfalls & the Backorder Queue stock_allocation_priorityNew
Whenever a dealer tries to order more of something than is actually available, the order is refused — stock is always first come, first served — but the attempt isn't lost. It's logged under Stock Shortfalls: who wanted it, how much, and how much there was. That log is your demand signal for production and restocking, and with the daily digest switched on (stock_shortfall_digest) Warehouse and office get it by email each morning.
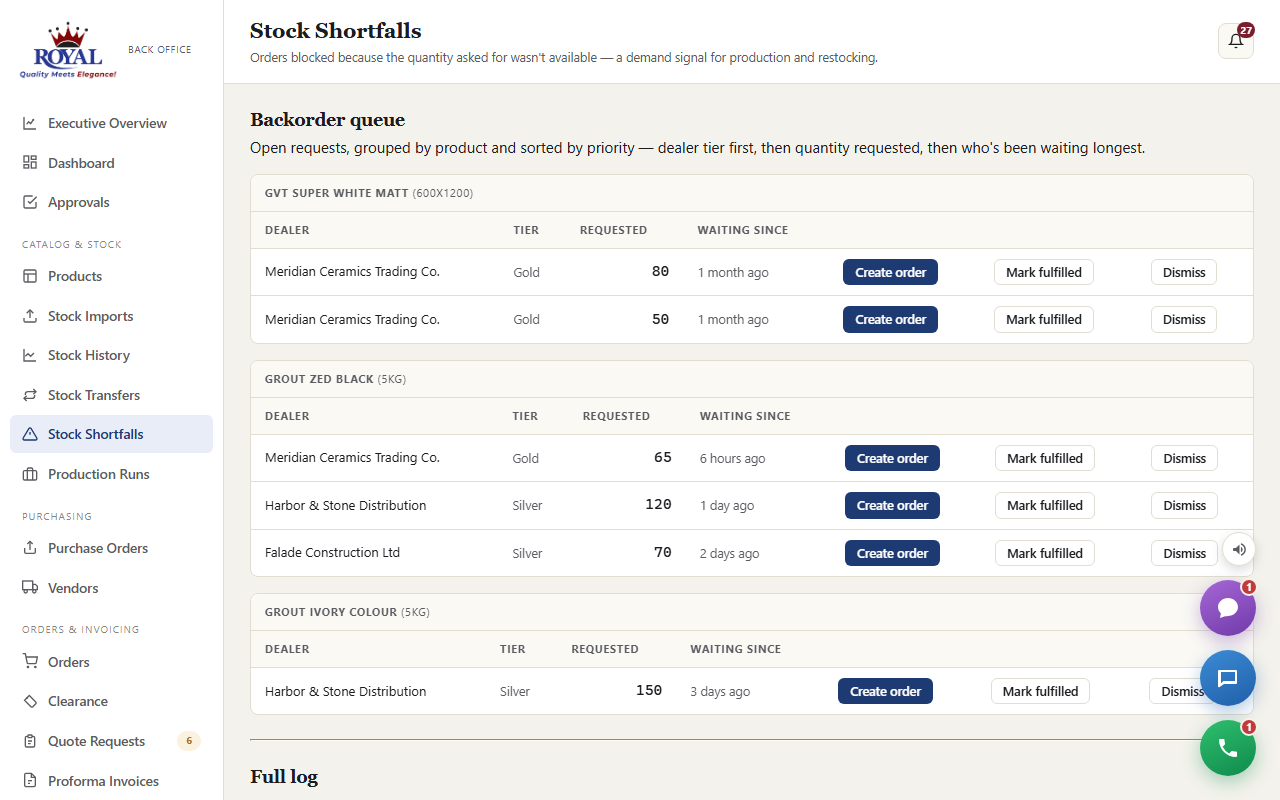
The Backorder Queue at the top of the page turns that log into a to-do list. Requests are grouped by product and ranked: dealer tier first (Platinum before Gold before Silver), then the largest quantity, then whoever has waited longest — so when stock comes back, there's a fair, defensible order to serve people in instead of whoever phones first.
serve the queue once stock is back
- Open Stock Shortfalls and find the product in the Backorder Queue.
- On the top row, click Create order — the New Order form opens already filled in with that dealer, the product and the quantity they wanted. Check it and click Create order.
- Back on Stock Shortfalls, click Mark fulfilled on that row.
- If a dealer no longer needs it, click Dismiss instead.
Production Runs & Quality Checks production_managementNew
A production run tracks a batch from plan to finished stock: the product, how much, which stock bucket it goes into (STD, ECO or G&A), and when it should be ready. Two quality checkpoints are built in — one before production starts, and one after it finishes that must pass before the batch can join live stock.
run a batch from plan to stock
- On Stock Shortfalls, click Start production next to a blocked order (or use Production Runs → + New production run).
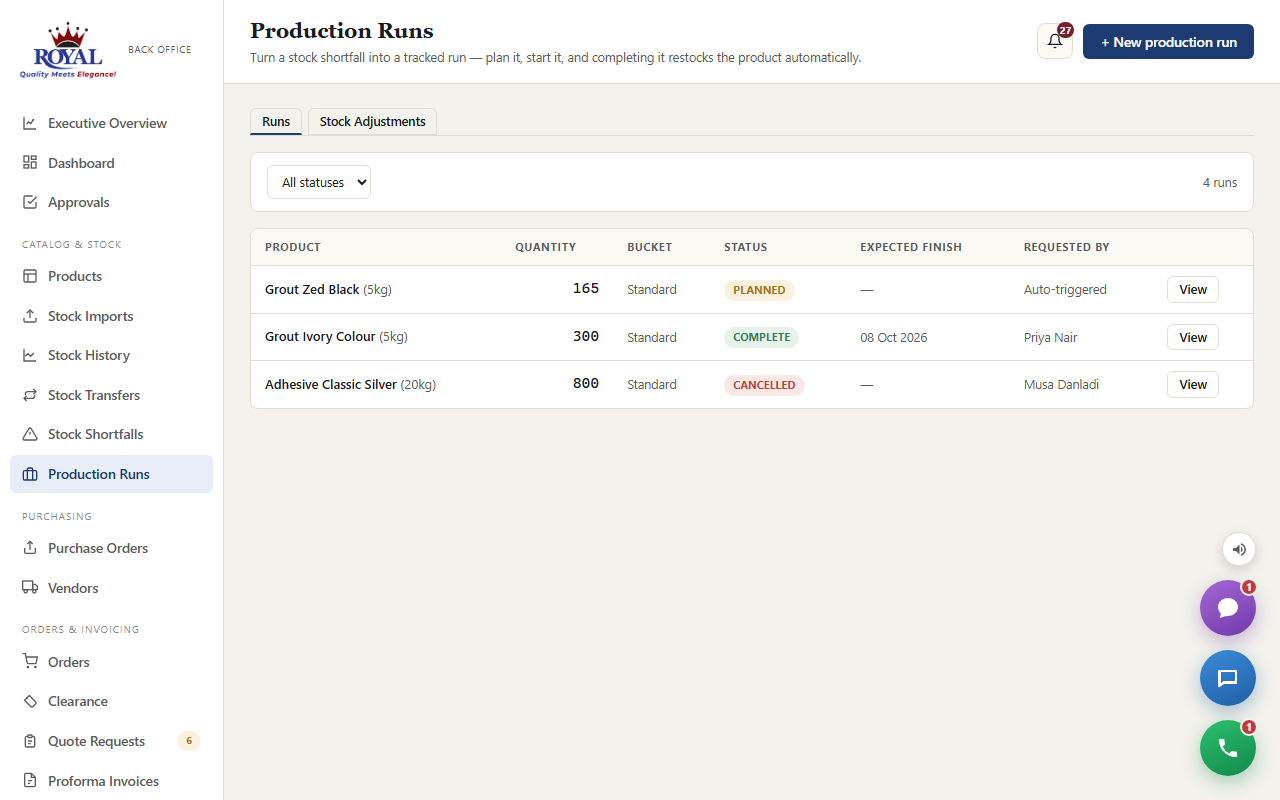
- Enter the Quantity being produced, the Stock bucket and an Expected finish date, then click Create production run. It starts as Planned.
- Under Quality checks, record the pre-production check — materials and line ready — as Passed or Failed, with a note. This one is a record, not a gate.
- Click Mark in progress when production starts.
- When it's done, record the post-production check (colour, dimensions, weight — whatever applies). Complete & restock only appears once this check has passed.
- Click Complete & restock and confirm.
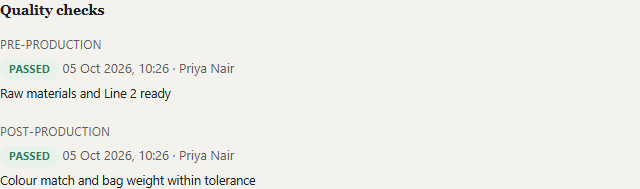
A failed post-production check keeps the batch out of stock. Only a Super Admin can override it, by giving a written reason — the override and the reason are permanently recorded on the run.
Automatic production triggers production_auto_triggerNew
Each morning the system adds up unmet demand per product from Stock Shortfalls. If it passes a threshold within a lookback window (by default 50 units in 7 days, set under System Settings), a draft production run is created automatically and the team is alerted — no more relying on someone noticing. It shows as Auto-triggered in the Production Runs list. Nothing is produced until someone reviews and starts it.
Stock Adjustments production_managementNew
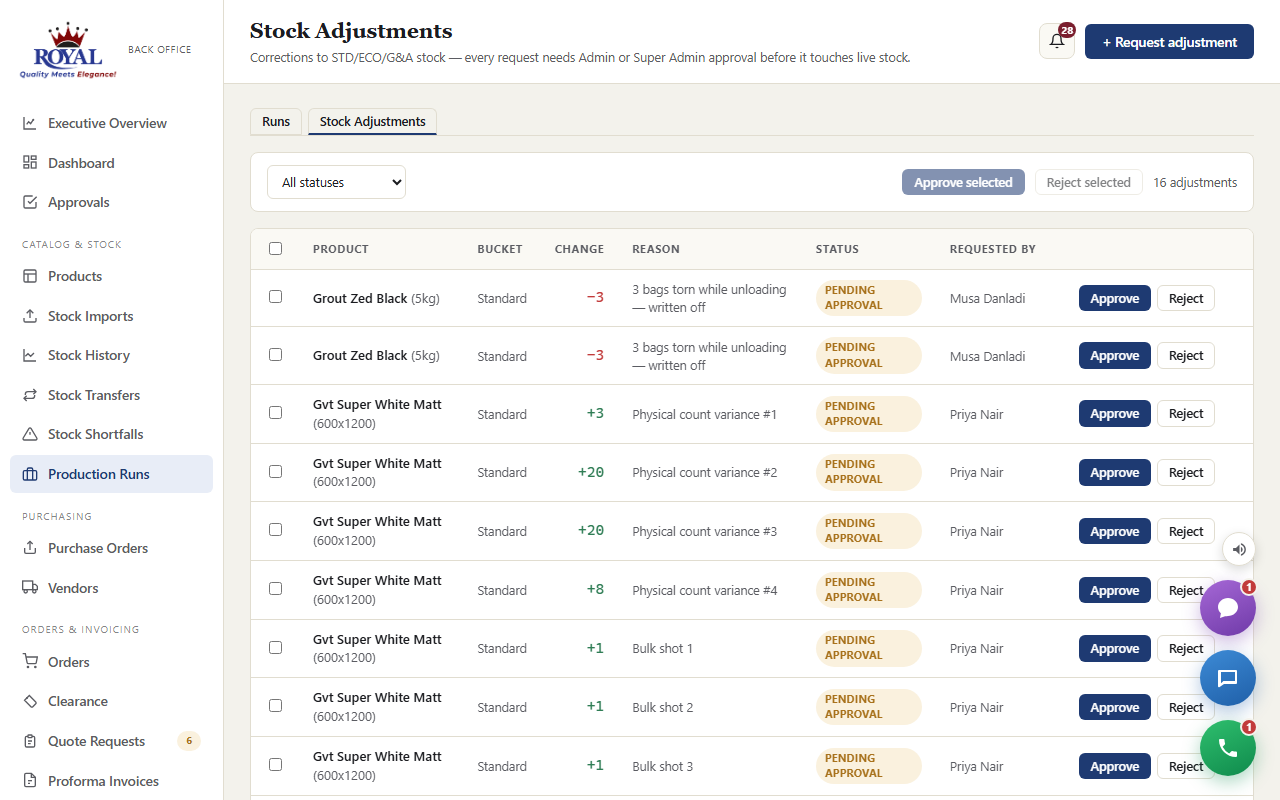
Corrections to stock — damaged bags written off, a recount that found extra — are owned by Warehouse but never change live stock on their own. Each one waits for an Admin or Super Admin to approve it, with the reason recorded either way.
correct a stock level
- Warehouse opens Production Runs → Stock Adjustments and clicks + Request adjustment.
- Pick the Product, enter the change (for example
-3or20), choose the Stock bucket, and explain the Reason. - Click Submit for approval — it shows as Pending.
- An Admin reviews the pending list and clicks Approve or Reject — or ticks several and approves or rejects them together.
Customers (Dealers)
The office menu calls them Customers; the dealers themselves see the Supplier/Dealer Portal. Every new customer gets a customer ID (for example CUST-00031) the moment it's created.
add a new customer
- Go to Customers and click + Add customer.
- Fill in Company name (required), plus Contact person, Phone, Company email, Address, Territory, Dealer tier, Status (Active/Inactive), and any Internal notes.
- Optionally give them portal access straight away: enter a Login holder's name and Login email — or leave both blank and add a login later.
- Click Add customer.
give an existing supplier a new portal login
- Open the supplier from the Suppliers list.
- Under Portal logins, enter a Name and Email.
- Click + Add login.
Credit limits credit_limits
If turned on, you can set an optional spending limit per supplier — a warning, not a hard block, so your judgment always has the final say.
set a supplier's credit limit
- Open the supplier and enter an amount in Credit limit.
- Click Save changes. Leave it blank for no limit at all — nothing changes for that supplier until you set a number.
New Customer Approval customer_approval_workflowNew
With this on, a newly added customer starts as Pending until an Admin or Super Admin approves it. The customer still gets its customer ID straight away, and the admin is notified. If whoever added it also entered a portal login, that login is held, not lost — it's sent automatically the moment the customer is approved, and discarded if it's rejected.
approve a new customer
- Open Approvals — new customers waiting on you are listed under New customers (alongside any discount requests and credit holds that need you).
- Click the customer to open their profile. The Awaiting your approval box says who requested it and which login (if any) will be sent.
- Click Approve — or type a reason and click Reject.
The Dealer Profile New
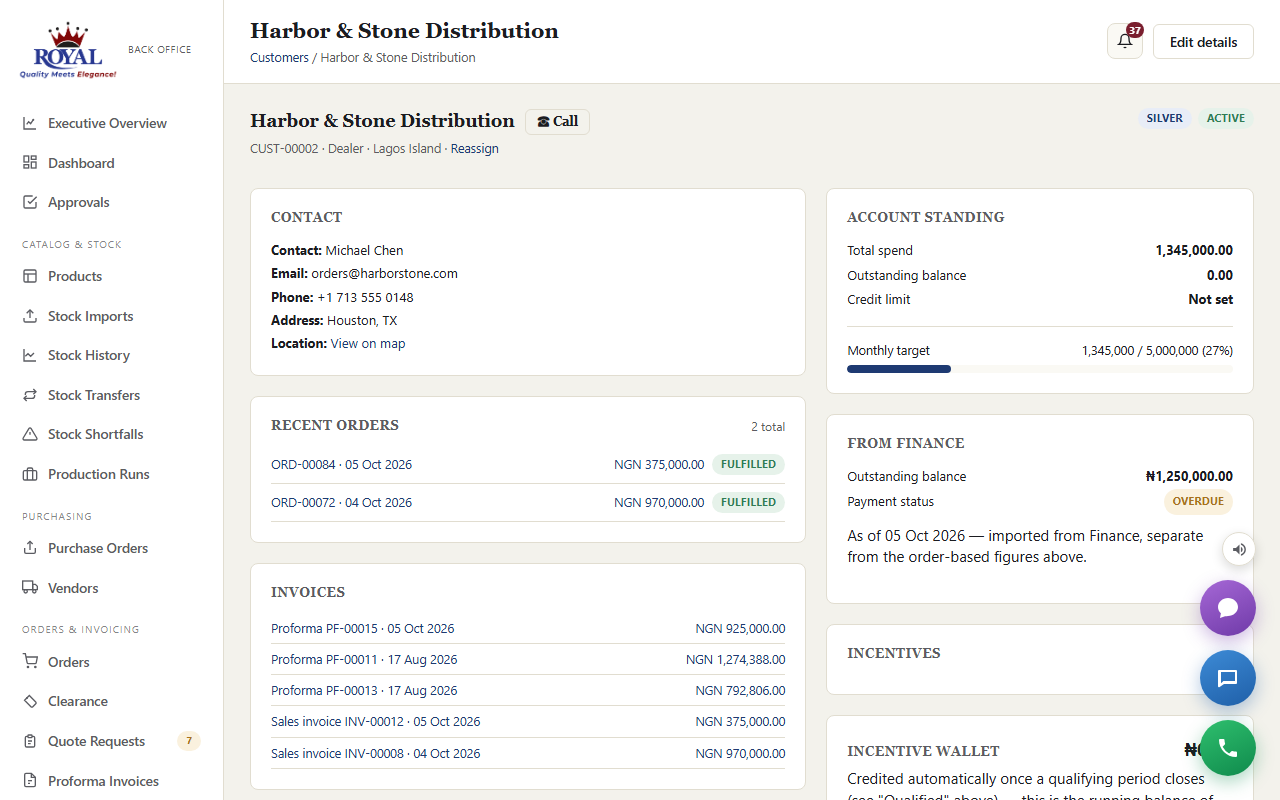
Click Profile on any customer to see everything about them on one page: account standing (credit limit, outstanding balance, sales target progress), contact details and account manager, recent orders, proforma and sales invoices, complaints, visits and follow-ups, incentive wallet, merchandising photos and portal logins.
Reassigning the account manager
Next to the account manager's name, click Reassign, pick the new rep, add a note if you like (for example "Territory realignment"), and click Reassign — notifies both reps. The old and new rep are both told, and the change is recorded in the audit history. Admins, Super Admins and Sales Managers can reassign.
Merchandising photos merchandising_review
Keep a record of how each dealer displays Royal products: under Merchandising review, add an optional caption, choose a photo and click + Add photo.
See what the dealer sees — "Log in as"
Under Portal logins, click Log in as next to any active login to open the portal exactly as that dealer sees it — useful when they phone with a question. Admins and Sales Managers can do this for any dealer; a sales rep, only for the dealers they manage. A banner stays on screen the whole time, everything you do is logged as done on their behalf, and Exit Masquerade brings you straight back to the office.
Customers on the map customer_geo_mapping
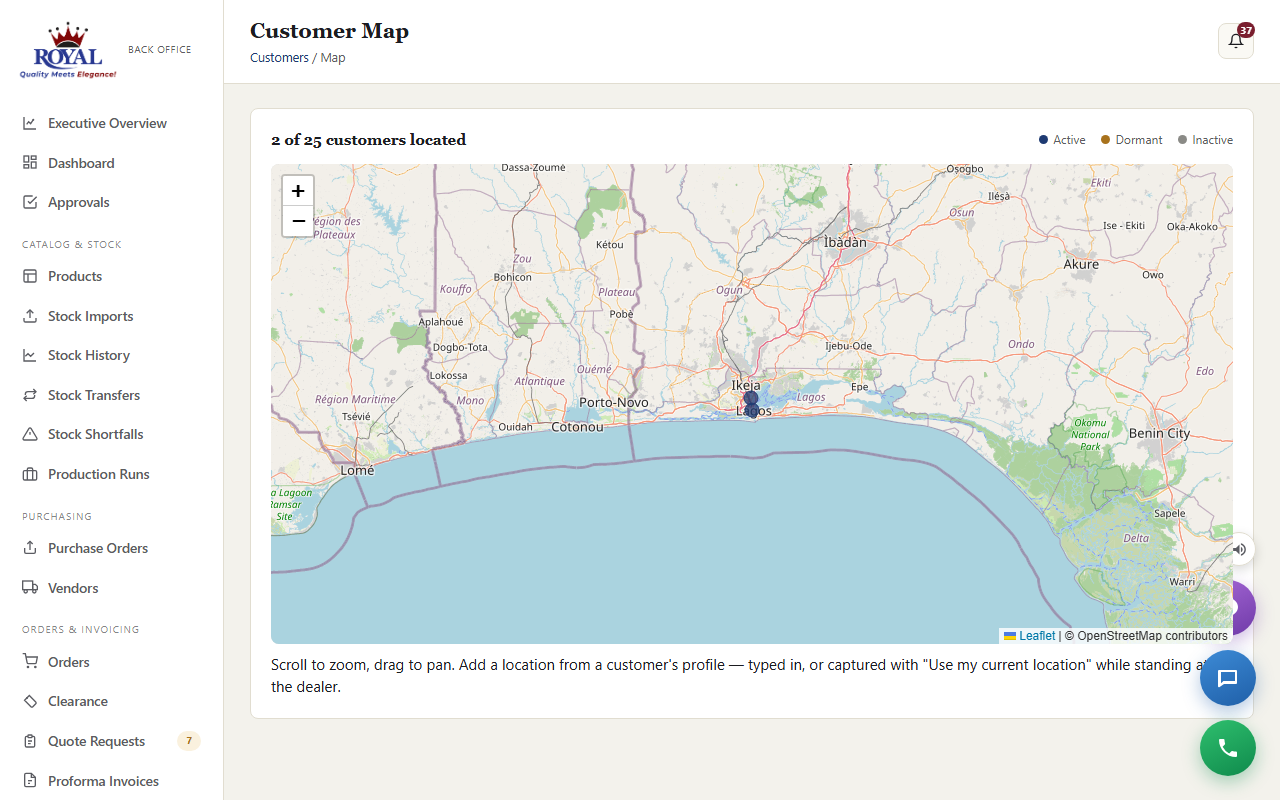
Give a customer a location (type the coordinates, or use Use my current location while standing at their shop) and they appear as a pin on the Customer Map page in the menu.
Customer Tiers & Portal Visibility customer_tiersNew
Not every account buying from Royal is a dealer on a standard tier. If your business also sells to individuals, contractors, government bodies, or other non-dealer customer types, two settings work together to handle them properly.
Customer type & non-dealer tiers
Every supplier record has a Customer type (Dealer, Individual, Contractor, Government, and others) set on their profile. Dealers keep using the existing Dealer tier field (Bronze/Silver/Gold/Platinum, tied to sales targets). Any non-dealer type instead gets its own separate Customer tier field — a simpler, independent list you manage under Customer Tiers in the sidebar, since non-dealer accounts don't need sales-target machinery.
What non-dealers see on the portal
A system-wide setting, Non-dealer portal visibility, controls how much of the register non-dealer accounts can see once logged in:
This is one switch for every non-dealer account at once, set under System Settings — dealers are never affected by it either way.
Bulk Customer Import customer_importNew
Onboarding a batch of customers from a spreadsheet works the same safe, preview-first way as Bulk Stock Uploads.
import a batch of customers
- Go to Customers and click Bulk imports, then Upload.
- Choose a CSV or XLSX file with columns Company, Contact, Email, Phone, Address, Type.
- Review the preview — each row is marked update (matched an existing customer by email, or by company name if no email was given), create (a new customer), or skip (missing a company name, or a duplicate of another row in the same file).
- Click Apply.
Orders
An order can start in one of two ways: you create it directly for a supplier who calls or walks in, or a supplier's own quote request gets converted into one (see Quote & sample requests).
create an order directly for a supplier
- Go to Orders and click + New order.
- Choose the Supplier and Payment terms (Cash on delivery, Net 15, Net 30, or Net 60), and add an optional note (e.g. "Phone order, walk-in customer").
- In the products table, type a quantity next to each product the supplier is buying — leave the rest blank. Only priced products can be ordered; set a Unit price on the product first if it's missing.
- Click Create order.
An order moves through stages as work progresses:
move an order to its next stage
- Open the order.
- Under Update status, choose the new status from the dropdown.
- Click Save & notify supplier.
Stock holds — reserving stock for accepted orders
If Order Stock Holds is turned on, Royal's stock is protected the moment an order is accepted, so it can't accidentally be promised twice:
- Setting an order to Confirmed automatically holds the ordered quantity for a set number of hours (your administrator sets this — 48 hours by default). The physical stock count doesn't change yet, but it's no longer shown as available to other suppliers.
- Setting the order to Fulfilled actually deducts that stock for real.
- If you cancel the order, or if nobody fulfils it before the hold's time runs out, the hold is released automatically and that stock becomes available again — you'll get an email if a hold expires unfulfilled, so nothing goes unnoticed.
You can see every hold tied to an order — what it reserved, and whether it's still active, was fulfilled, released, or expired — right on the order's page, and a running list of all of them under Reports.
Order Status Tracker New
Every order page opens with a visual progress bar — the same style whether you're viewing it in the office or a supplier is viewing it on their own account, so everyone is reading the exact same picture of where an order stands.
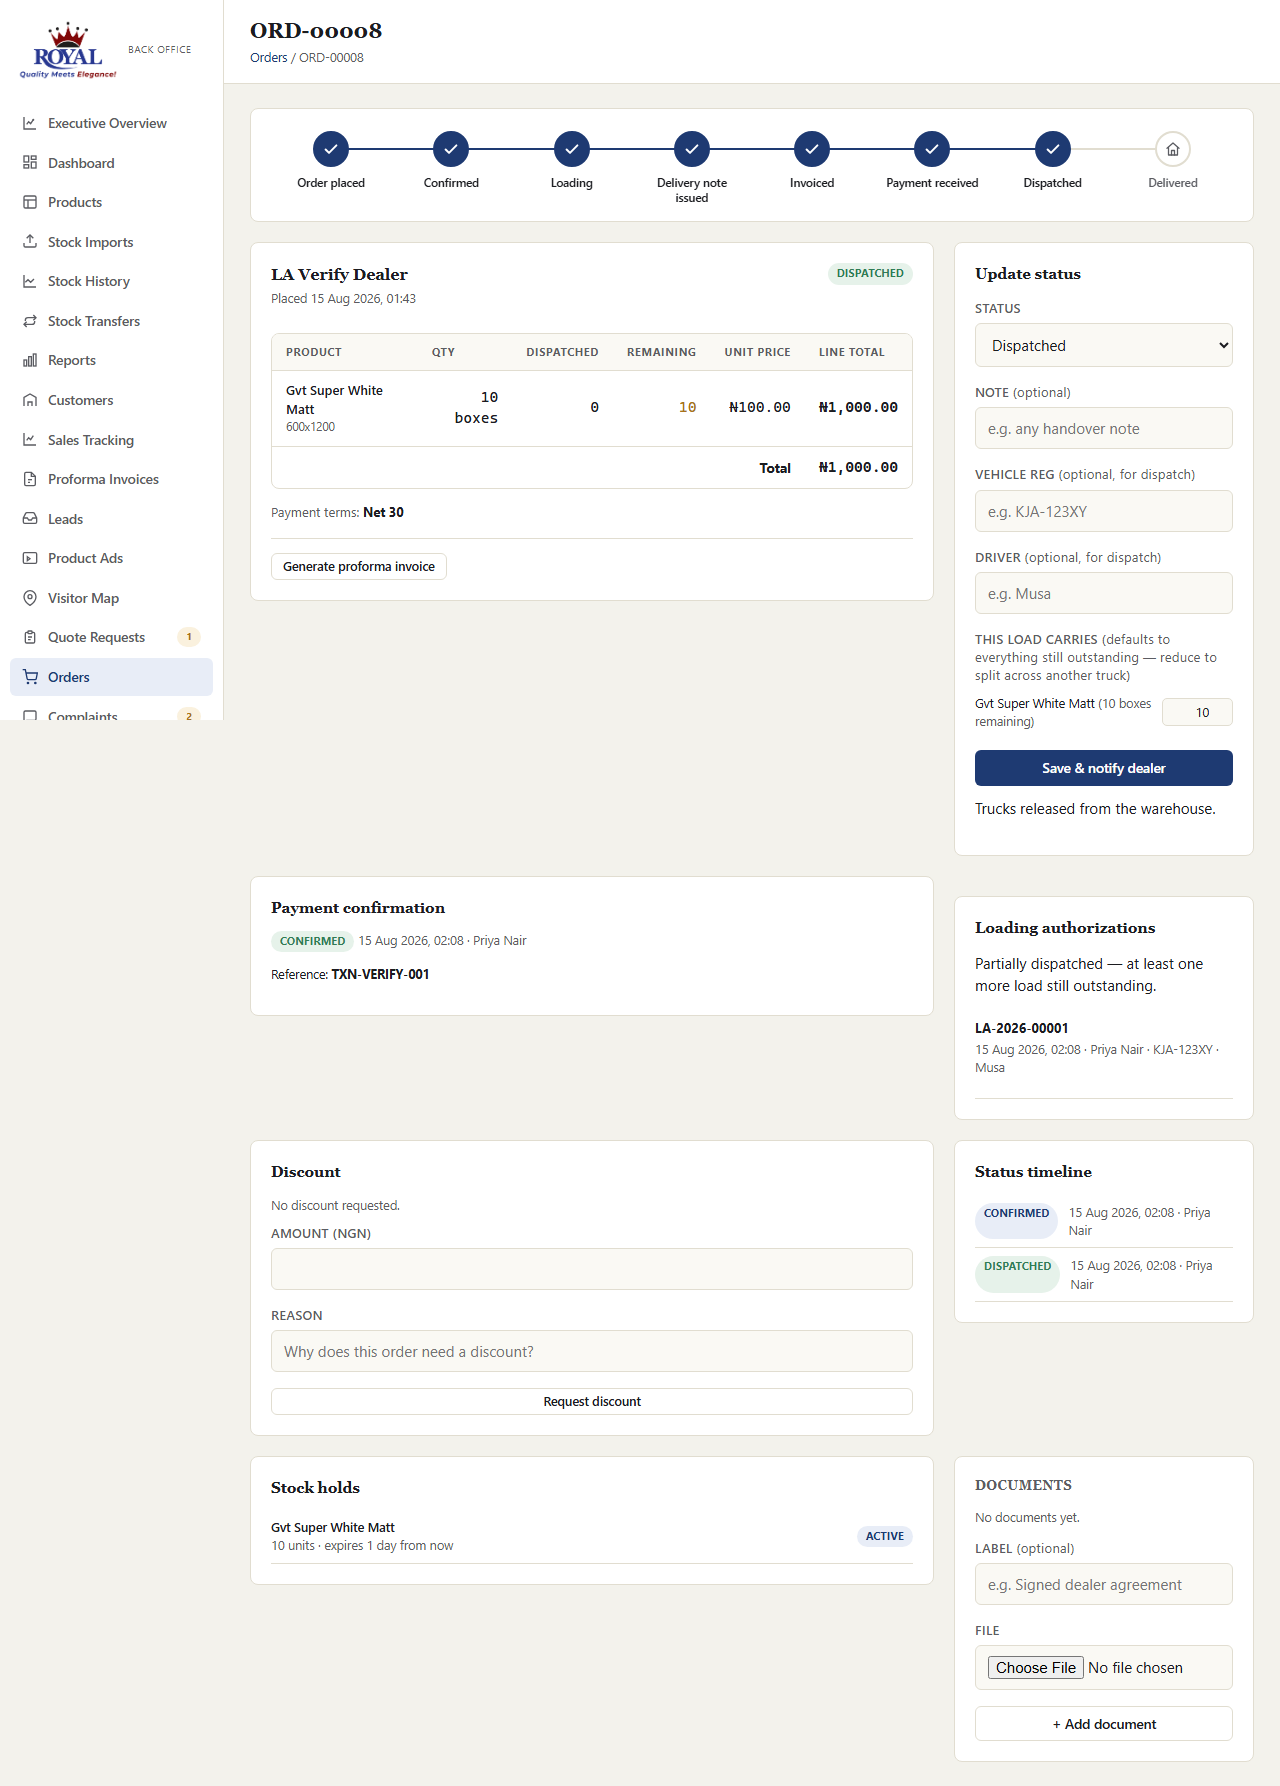
Suppliers see a simpler five-milestone version of the same bar on their own order page — Order placed → Confirmed → Processing → In transit → Delivered — with the four internal administrative stages folded into a single "Processing" step. In transit stays highlighted as the current step for the entire time a truck is on the road, from the moment you mark an order Dispatched until you mark it Fulfilled; it only checks off once the order is actually fulfilled.
A checked-off progress bar always means real, completed steps — never a guess. If an order is cancelled, both the office and the supplier see a plain "Cancelled" notice instead of a partially-filled bar, since a cancelled order was never actually on track to finish.
Discounts order_discountsNew
Anyone in the office can request a discount on an order; only a Sales Manager or Super Admin can approve or reject it — keeping the ability to ask for a discount separate from the authority to grant one.
request a discount
- Open the order and find the Discount card.
- Enter an Amount and a Reason (e.g. "loyal dealer, matching a competitor quote").
- Click Request discount.
approve or reject a discount Sales Manager
- Open the order — the Discount card shows Approve and Reject buttons only once a discount has actually been requested.
- Optionally add a decision note.
- Click Approve or Reject.
Credit Approval Workflow credit_approval_workflowNew
This replaces the soft Credit limit warning with a real hold that has to be formally cleared. If a new order would push a supplier over their credit limit, it's created anyway but flagged Credit: Pending automatically — nobody has to remember to check.
clear a credit hold Finance
- Open the flagged order — the Credit approval card only appears at all once an order genuinely exceeds that supplier's limit.
- Optionally add a note (e.g. "approved, dealer has paid down balance").
- Click Approve or Reject.
Dispatch & Loading Authorization loading_authorizationNew
This is the one hard gate in the system: an order can't move to Dispatched until every relevant check has genuinely passed — payment confirmed, credit clear, stock actually held, and any discount approved. Each check is simply skipped (counted as passed) if its own feature isn't turned on.
confirm payment before dispatch
- Open the order and find the Payment confirmation card.
- Enter the Payment reference (bank transfer ref, teller number, etc.).
- Click Confirm payment received.
dispatch an order
- Set the order's status to Dispatched and optionally fill in Vehicle reg and Driver.
- Click Save & notify supplier.
Choosing the truck, driver and destination logistics_management
When you set an order to Dispatched, start typing in Vehicle or Driver to pick from your roster — or type a registration or name that isn't in it, for a one-off hired truck. Point of delivery fills in from the order's delivery address (pick a territory or type another drop-off if it differs), and the point of loading comes from your settings. Both are saved with the dispatch, so the route stays accurate even if the settings change later.
Splitting a dispatch across more than one truck partial_dispatch
If an order is too large for one load, dispatch it in parts: when you set status to Dispatched, each line item defaults to "everything still outstanding" but you can reduce any quantity to send only part of it. The order's items table then shows Dispatched and Remaining columns, and the order only reaches Fulfilled once every last unit has actually gone out across however many loads it took.
Payments & Instalments partial_paymentsNew
Every order has a Payment confirmation card. If the dealer pays in one go, enter the reference and click Confirm payment received. If they pay in instalments, log each one as it arrives — the card keeps a ledger of every payment with who logged it, plus the Paid so far and Balance due.
A truck can't leave until enough has been paid. By default that means the whole amount; a Super Admin can lower it under System Settings → Minimum payment to dispatch (%) (for example 60%), so a trusted dealer's goods can go out once most of the money is in.
log an instalment
- Open the order and find the Payment confirmation card.
- Under Log a payment, enter the Amount and the Reference (teller number, transfer reference).
- Click Log payment.
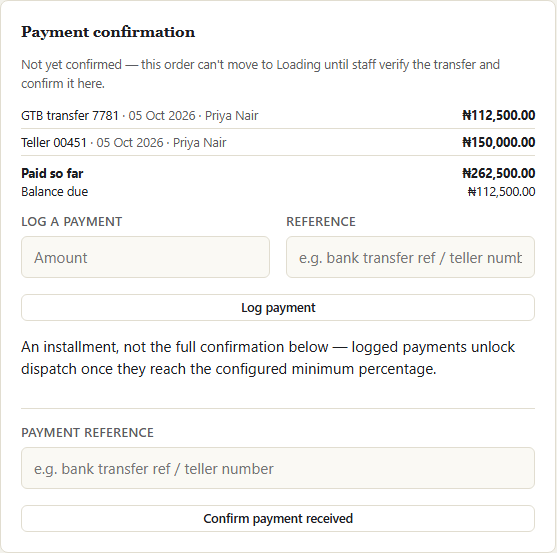
Require payment before loading payment_before_loading moves the payment check earlier: an order can't even move to Loading until payment is confirmed.
Dealer Deposit Wallet deposit_walletNew
Some dealers prefer to pay Royal a large sum in advance and draw it down as they order. Each dealer has a main wallet for exactly that. Money only goes in once Finance confirms it arrived; it comes out when it's spent on an order or refunded, and it goes back in automatically if an order it paid for is cancelled. It's for buying only: dealers can't withdraw it themselves.
confirm or record a deposit (Finance or Admin)
- When a dealer reports a transfer, it appears under Deposits to confirm in Approvals, and you get a notification. Click it to open the dealer's profile at their Main wallet card.
- Check the amount and reference against the bank statement, and the receipt if they attached one (View receipt).
- Click Confirm — money arrived, or type a reason and click Reject.
- If a dealer pays without reporting it, record it yourself: on their Main wallet card, fill in Record a deposit received and the bank reference, then click Add to wallet.
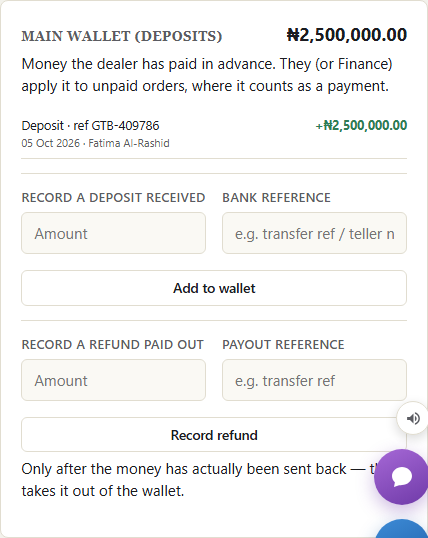
Paying an order from the wallet for a dealer: on the order page, in the payment card, use Pay from the dealer's main wallet. It's logged as a payment on the order; paying the whole balance marks the order confirmed paid, so it can be dispatched.
Refunds: only after you've actually sent the money back, use Record a refund paid out on the Main wallet card. You can't refund more than the wallet holds.
Set the bank account dealers should transfer to under System Settings → Bank details for dealer deposits. Paying from the wallet also frees up the dealer's credit, because their outstanding balance only counts what they still owe.
Proof of Delivery delivery_managementNew
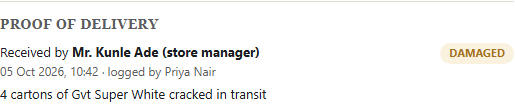
When an order is marked Fulfilled, Warehouse or Logistics records the handover: who received it, its condition — Delivered clean, Shortage, Damaged or Rejected — any notes, and optionally a photo. It's saved on the order permanently.
Anything other than a clean delivery opens a customer complaint automatically (when Complaints is on), already linked to the order and describing what happened — so the dealer never has to phone in to report it, and it lands in the same queue with an SLA like any other complaint.
record a delivery
- Open the order, set the status to Fulfilled.
- Fill in Received by and choose the Delivery condition. Add Delivery notes and a Delivery photo if there's anything to show.
- Click Save & notify dealer.
Sales Invoices sales_invoicesNew
The moment an order is marked Fulfilled, a final sales invoice is generated automatically — different from a proforma invoice, which is issued before delivery. It reflects what was actually delivered, priced from the order, with any approved discount shown as its own line. Find them all under Sales Invoices, open one to view it, or download the branded PDF. The dealer can view and download theirs from the portal too.
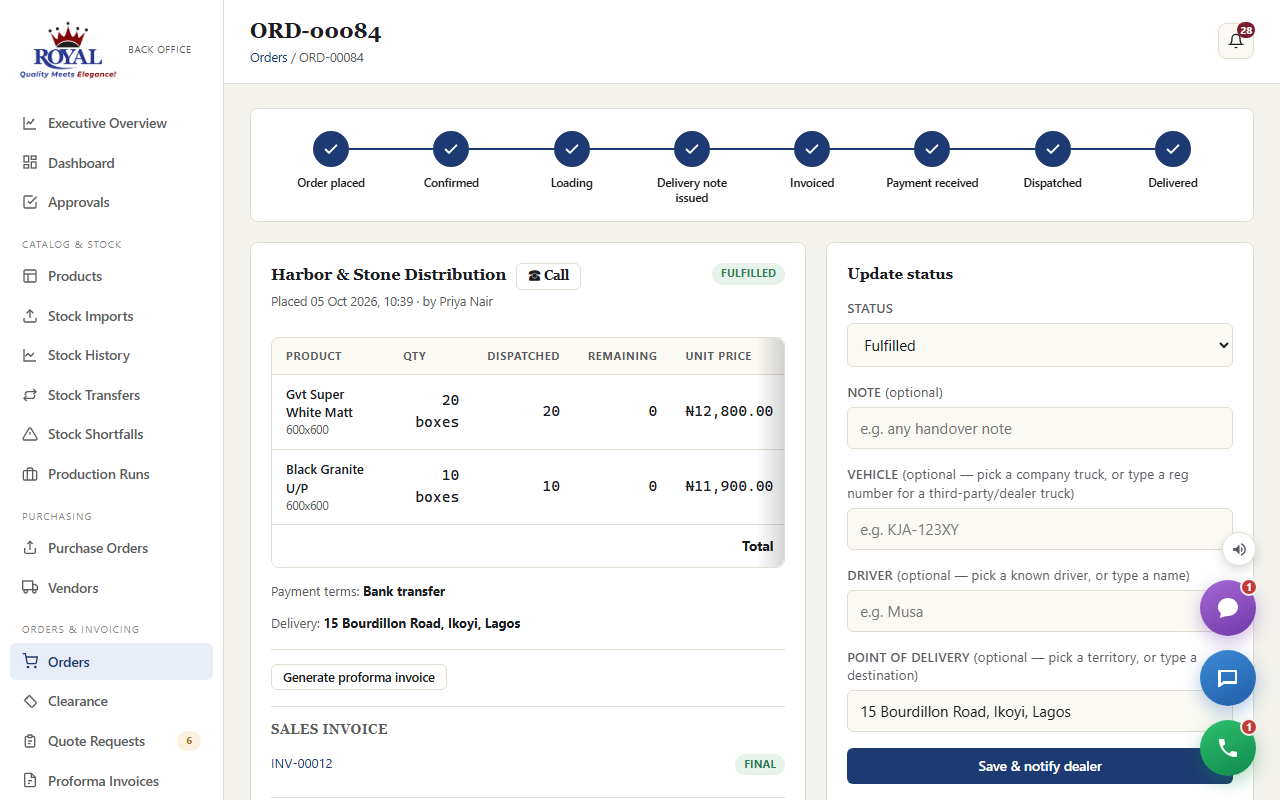
An invoice is only created once per order, and never blocks the delivery itself — if anything went wrong generating it, the order is still fulfilled and you can generate it from the order page with Generate sales invoice.
Quote & Sample Requests
When a supplier adds products to their cart and submits it, or requests a single sample, it lands in your Quote Requests queue for review — nothing changes on the register until you act on it.
review and respond to a request
- Open the request from the Quote Requests list — you'll see exactly what was requested next to the product's current live stock, plus any note the supplier left.
- Choose a new Status: Acknowledged (you've seen it and are working on it), Fulfilled, or Cancelled.
- Optionally add a Note to supplier — e.g. delivery timing or a substitution.
- Click Save & notify supplier.
turn a request into a priced order
- Open the request (this only applies to reorder requests, not samples, and requires pricing to be turned on).
- If any product listed isn't priced yet, you'll be told which ones — go set a Unit price on them first.
- Choose Payment terms.
- Click Convert & notify supplier.
Vendors & Purchase Orders purchase_orders
Raise a proper purchase order against one of Royal's own vendors and receive against it — including partial shipments — with a full record of what was ordered versus what actually arrived. This is the opposite direction from suppliers, who buy from Royal — vendors are who Royal buys from.
add a vendor
- Go to Vendors and click + Add vendor.
- Fill in Vendor name (required), plus contact, phone, email, address, and status.
- Click Add vendor.
raise a purchase order
- Go to Purchase Orders and click + New purchase order.
- Choose the Vendor, optionally an Expected date and a note.
- In the products table, enter a Qty and Unit cost for anything you're ordering — leave the rest blank.
- Click Create purchase order.
receive stock against a purchase order
- Open the purchase order.
- Under Receive stock, enter what actually arrived for each line — can be less than ordered (a partial shipment) or more (the vendor over-shipped); leave a line blank if nothing from it arrived this time.
- Click Record receipt.
Reports
The Reports page gives you a step back from individual products: stock totals by group and by category, how much activity (manual edits vs. bulk uploads) has happened in the last 30 days, which suppliers are most engaged (by how much they're watching and when they last logged in), and your most-watched products. If stock holds are turned on, a dedicated table shows every active and recently-resolved hold with full details; if credit limits are on, a Credit exposure table lists every supplier with a limit set, sorted by how much of it they're using; if purchase orders are on, an Open purchase orders table lists everything still awaiting delivery; if batch tracking is on, an Aging Stock table lists every tracked product's active batches, most urgent first. A full CSV export of the register is one click away.
Vehicles & Drivers logistics_managementNew
Instead of retyping the same truck registration and driver name at every dispatch, keep a roster of your fleet under Logistics → Vehicles and Logistics → Drivers. Each truck shows where it is in its working day — Released (free to use), Loading, Loaded, Dispatched, Delivered, On hold or Under maintenance — and the counts across the top tell you at a glance how much of the fleet is free.
add a truck
- Go to Logistics → Vehicles and click + Add vehicle.
- Enter the Reg number, and optionally the Type (e.g. 15-ton flatbed) and Capacity.
- Choose Ownership: Company fleet for your own trucks, Third-party / dealer for hired or dealer-arranged ones.
- Optionally set a Status — Released, Loading, On hold (with a reason) or Under maintenance — then click Add vehicle.
add a driver
- Go to Logistics → Drivers and click + Add driver.
- Enter their Name and Phone, and whether they're an Employee or Third-party / dealer driver.
- If GPS tracking is on, set a 4–6 digit PIN and tell the driver their phone number and PIN in person — nothing is emailed.
- Click Add driver.
Third-party truck alerts third_party_truck_alertsNew
Hired trucks often aren't ready the moment you need them. Add them to the roster as Third-party / dealer and set them On hold with a reason, for example "Waiting for the transporter to confirm". The moment someone edits one to Released, office, warehouse and logistics staff are alerted, and the Vehicles page shows how many hired trucks are free right now.
A truck you'll only ever use once doesn't need to be in the roster at all — you can still just type its registration at dispatch.
Live Tracking & the Driver's Phone gps_trackingNew
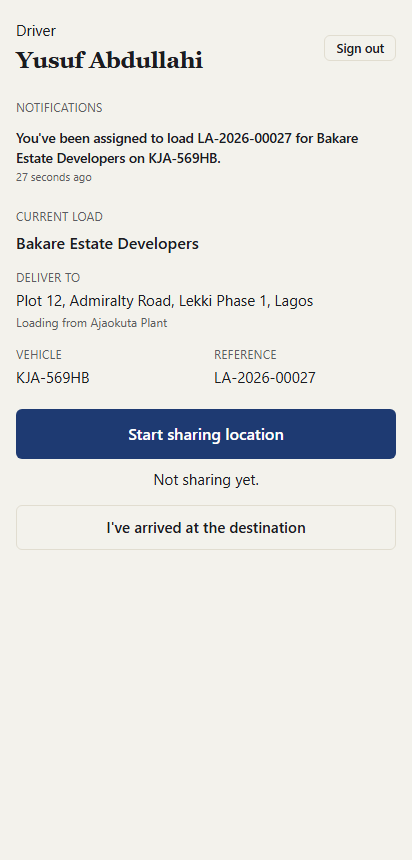
Drivers don't need to install anything. They open a simple page on their phone, sign in with their phone number and PIN, and see their current load — the dealer, where to deliver, the truck and the reference. From there they share their location while on the road, and tap once when they reach the destination.
get a driver tracking
- Give the driver a PIN on their record under Logistics → Drivers.
- Dispatch an order with that driver picked (see Dispatch & loading authorization).
- The driver opens
/driver/loginon their phone and signs in with their phone number and PIN. - They tap Start sharing location — the phone sends its position about once a minute while the page is open.
- On reaching the destination they tap I've arrived at the destination.
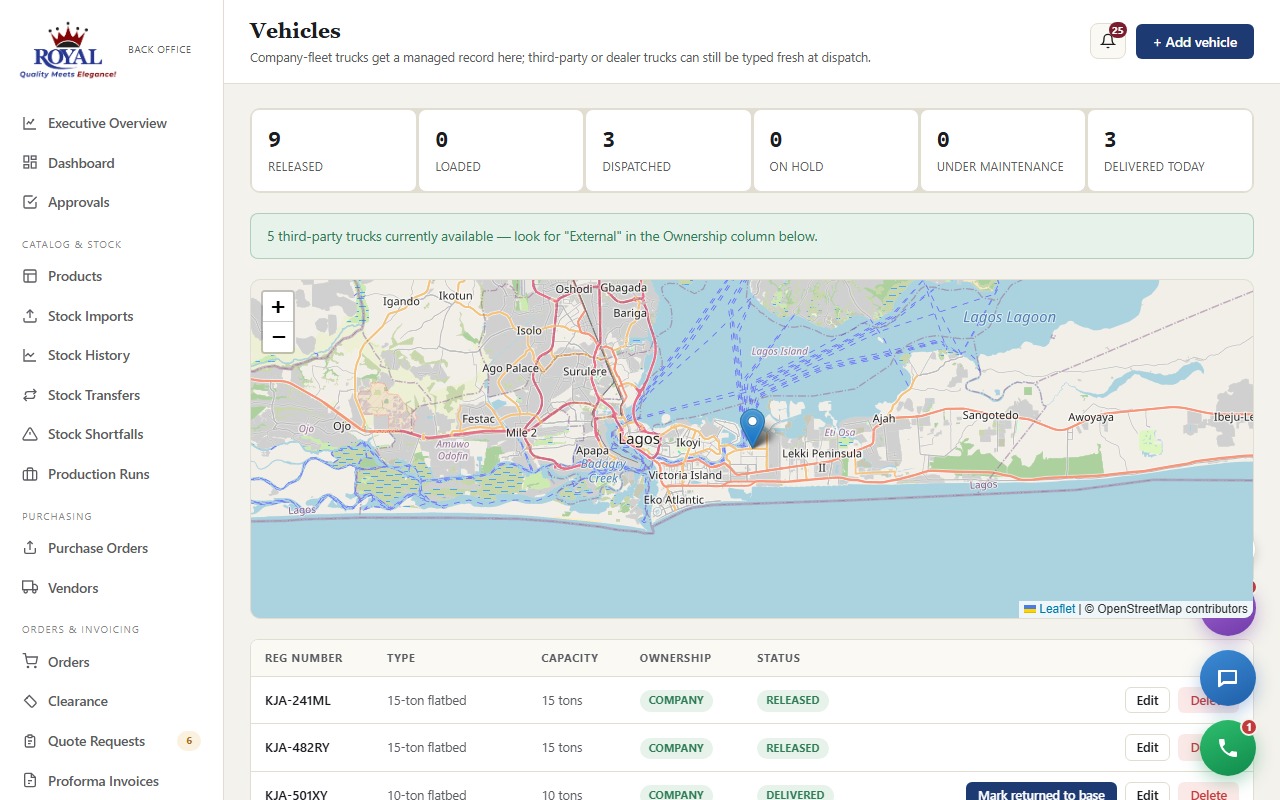
Driver without a phone, or a hired truck? Office can record the arrival instead — open the order and click Mark arrived at destination under its loading authorization.
Transit Timeline & Round Trips gps_trackingNew
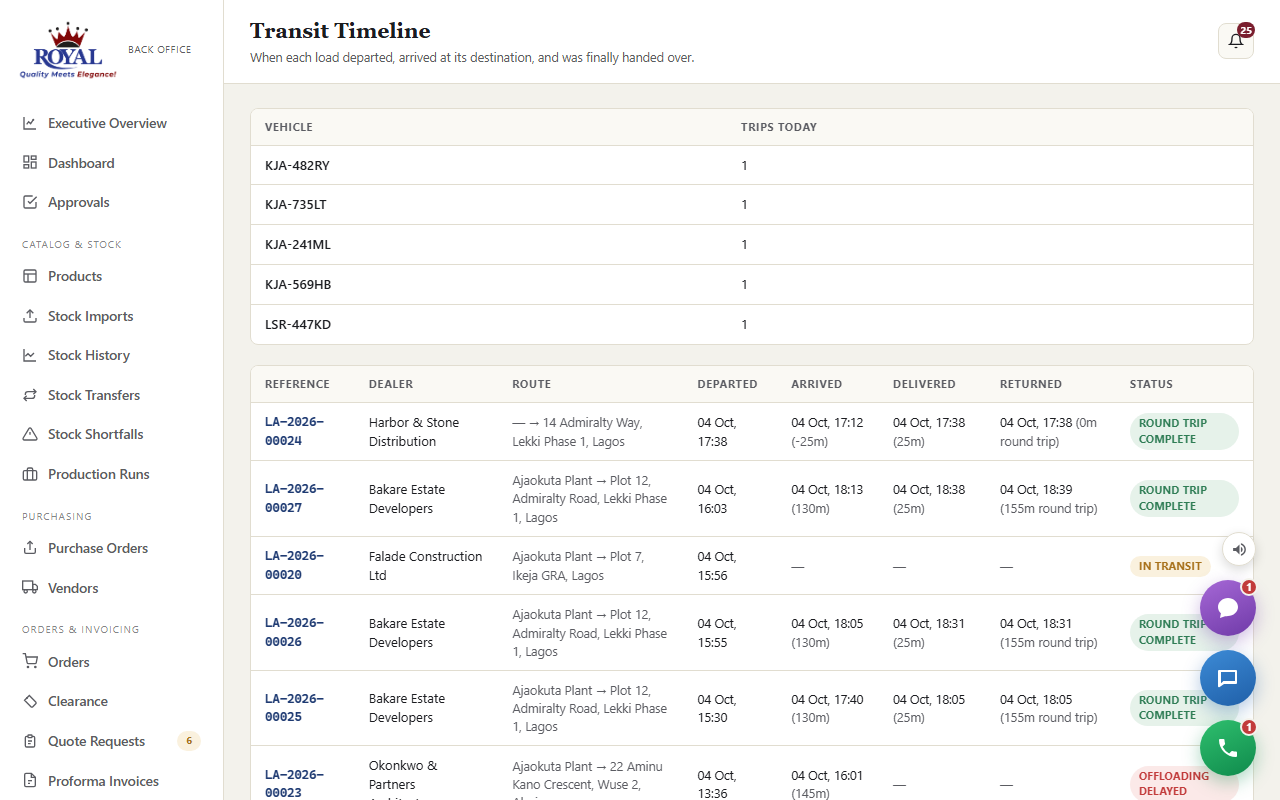
Every dispatch has a full timeline: when it departed (the loading authorization), when it arrived (the driver's tap, or office), when it was delivered (the proof-of-delivery handover), and when the truck got back to base. Logistics → Transit Timeline lists every trip with the time each leg took, the route from loading point to destination, and how many trips each truck has made today.
close out a trip
- Once the goods are handed over, open the order, set the status to Fulfilled, fill in Received by and the Delivery condition, and click Save & notify dealer. The truck now shows Delivered.
- When the truck is physically back, go to Logistics → Vehicles and click Mark returned to base on its row.
Offloading delays
If a truck has arrived but the goods still haven't been handed over after a set time, the trip is flagged Offloading delayed — on the timeline and on the order — so someone can chase it up while the truck is still standing there.
Setting the loading point and delay threshold Super Admin only
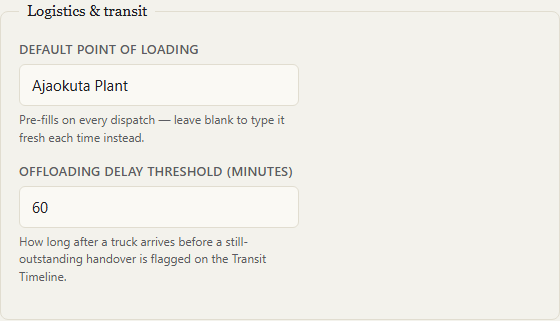
Under System Settings → Logistics & transit, the Default point of loading (for example "Ajaokuta Plant") is filled in on every new dispatch automatically, and the Offloading delay threshold sets how many minutes after arrival a trip is flagged (60 by default).
Complaints customer_complaintsNew
A complaint can come in two ways: you log one yourself after a phone call or site visit, or a supplier files one directly from their own portal — both land in the same Complaints queue.
log a complaint
- Go to Complaints and click Log complaint.
- Choose the Dealer and a Type (breakage, delivery delay, availability, or other), and optionally link the specific Order and/or Product involved.
- Set a Priority and write a Description.
- Click Log complaint.
work and resolve a complaint
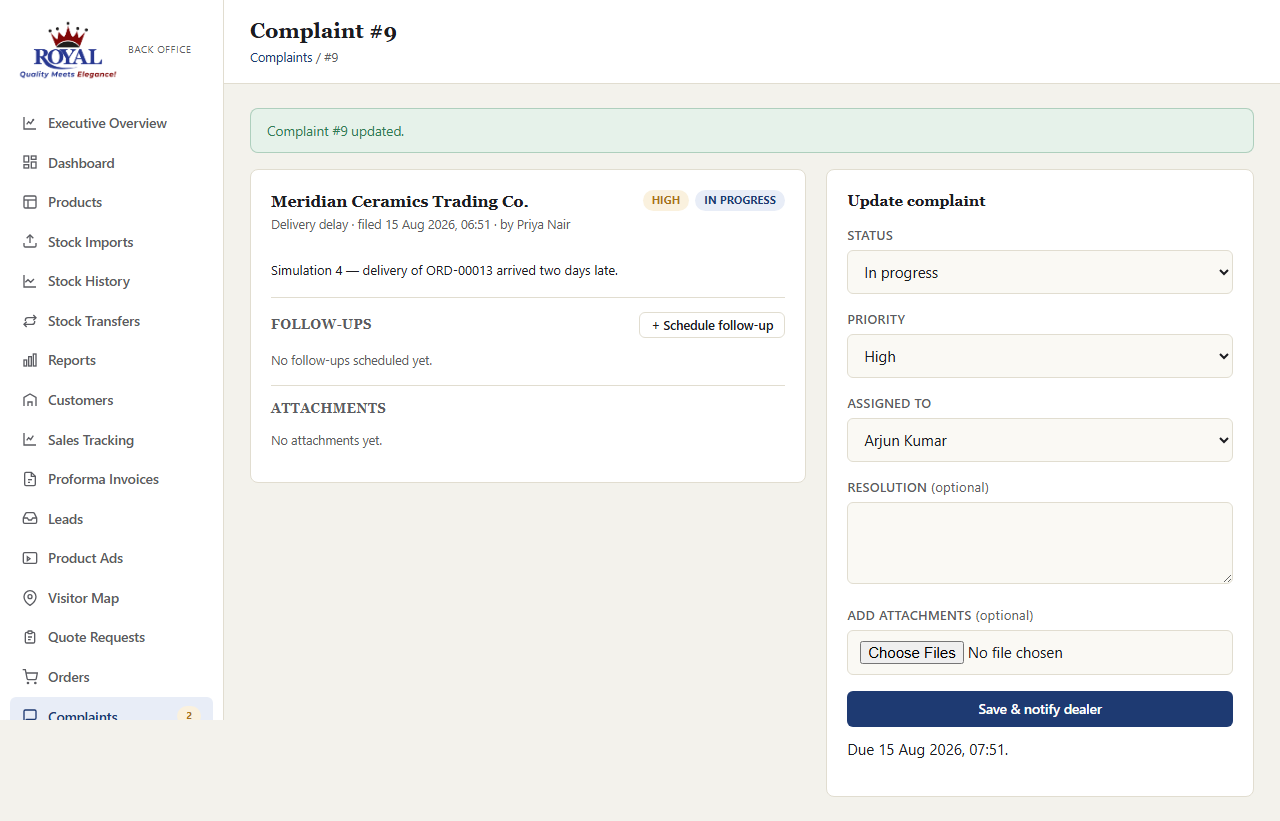
- Open the complaint, set Status to In progress and optionally Assign it to a staff member — the supplier sees this update immediately.
- Once it's sorted, set Status to Resolved and write what happened in Resolution.
- Click Save & notify dealer.
Follow-ups follow_up_managementNew
Schedule a call, visit, or check-in against any dealer — optionally tied to a specific complaint, order, or product — so nothing important relies on memory.
schedule a follow-up
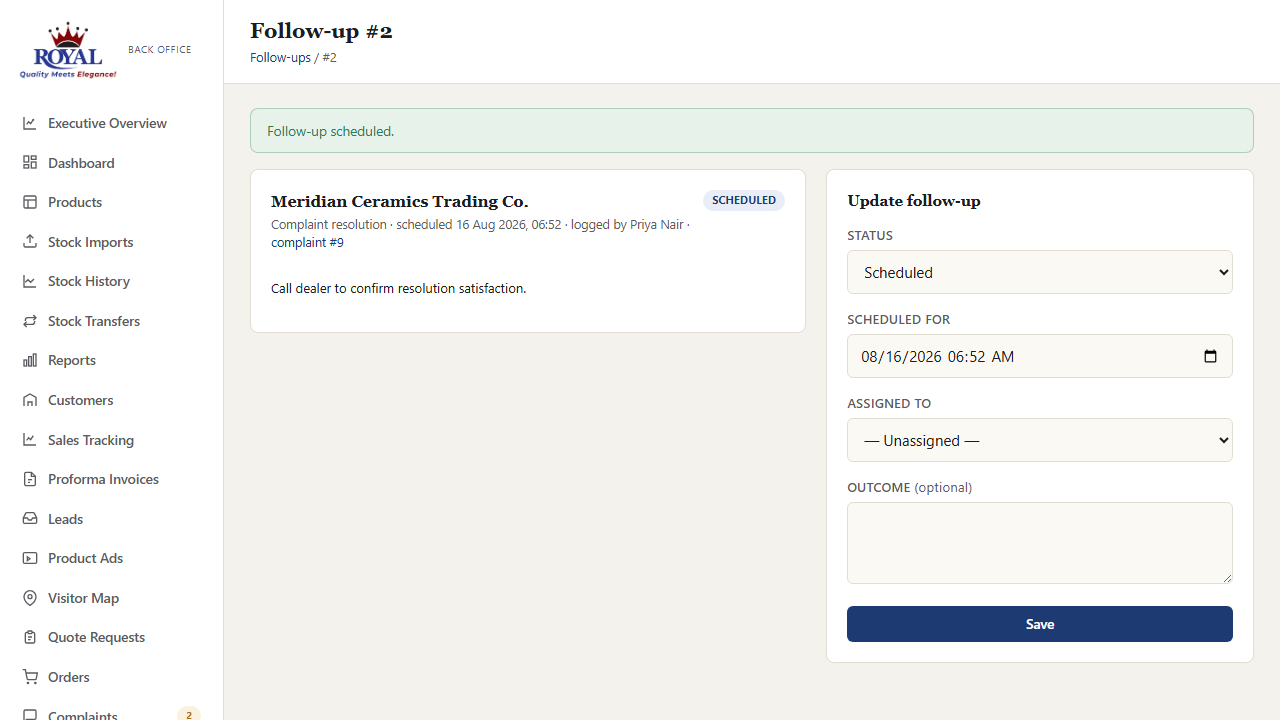
- Go to Follow-ups and click + Schedule follow-up (or click it directly from a complaint's page, which pre-fills the dealer and links it automatically).
- Choose the Dealer and Type, and optionally an Order, Product, and who it's Assigned to.
- Set Scheduled for and add any notes.
- Click Schedule follow-up.
Proforma Invoices proforma_invoicesNew
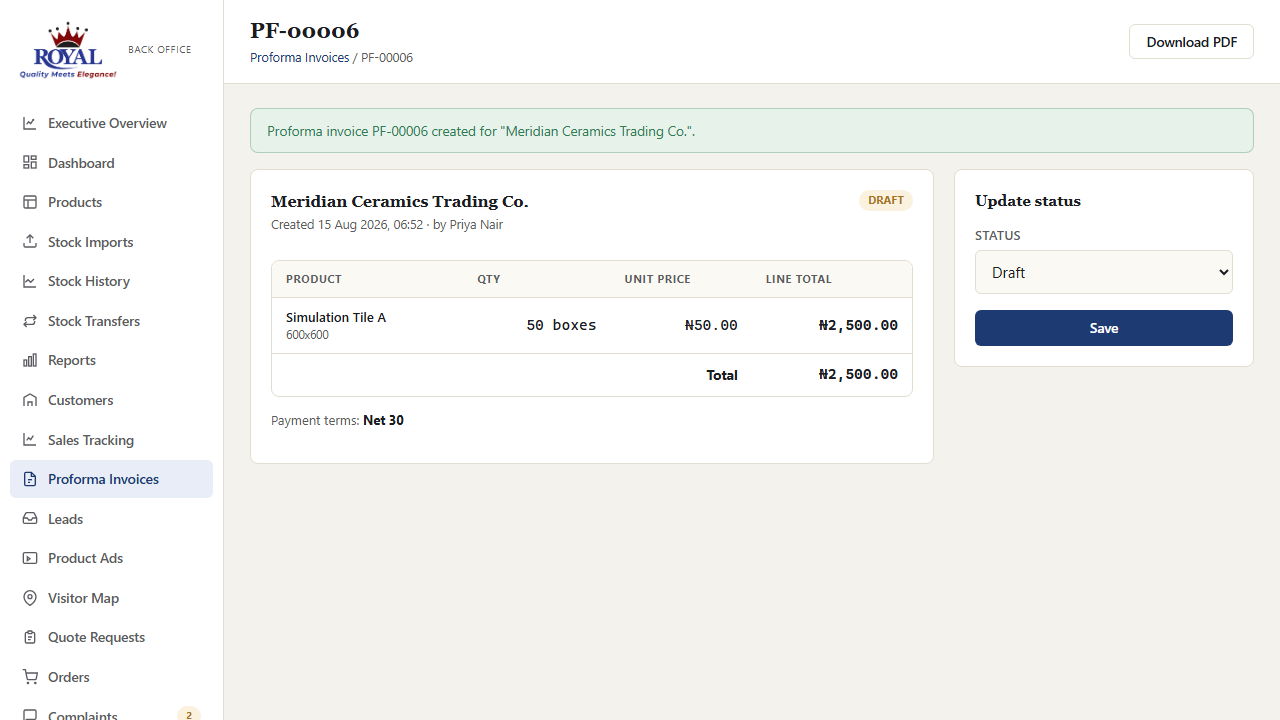
A proforma invoice is a formal quotation document — not a confirmed order, and it never touches stock or pricing until you decide to convert something for real.
generate a proforma invoice
- From an existing order's page, click Generate proforma invoice — its line items and prices are pre-filled automatically (still editable), or start fresh from Proforma Invoices in the sidebar.
- Adjust the Dealer, Payment terms, Valid until date, quantities, and prices as needed.
- Click Create proforma invoice.
Leads Pipeline lead_pipelineNew
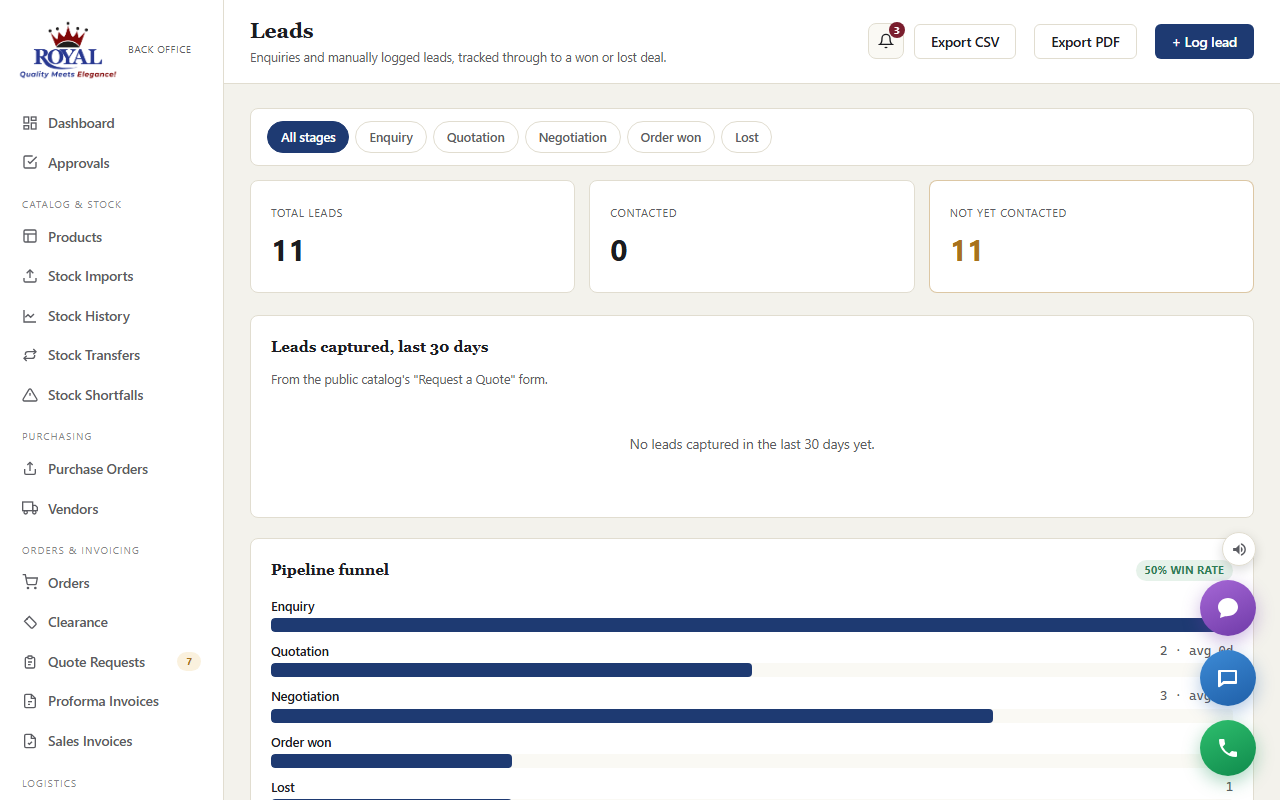
Leads collects every enquiry that isn't a customer yet — quote requests from the public catalog arrive automatically, and anything else (a phone call, a WhatsApp message, a walk-in, a referral) can be logged by hand so nothing gets lost. Each lead moves through stages — Enquiry → Quotation → Negotiation → Order, or Lost — and can be assigned to a rep.
work a lead from enquiry to customer
- Go to Leads and click + Log lead. Fill in the name, company, phone or email, the Source, the Customer type if known, and who it's Assigned to, then click Log lead.
- As the conversation moves on, open the lead, change its Stage, add a short Note about what happened, and click Save. Every change is kept as a history on the lead.
- When they're ready to buy, click Convert to customer — the company name and type carry over.
A lead left untouched too long is escalated automatically, so nothing quietly goes cold.
Approvals Inbox New
Approvals gathers everything waiting on you in one place, depending on your role: discount requests for Sales Managers, credit holds for Finance, and new customers for Admins (Super Admins see all three). Click any item to open it and decide.

Sales Tracking & Performance advanced_reporting
Sales Tracking shows how each rep's dealers are buying against their targets. Performance (for Admins, Super Admins and Sales Managers) compares reps side by side — quotations, conversions and orders — and each sales rep can see their own numbers under My Performance.


Weekly Sales Report advanced_reportingNew
On the Reports page, find Weekly Summary Report and click Generate →. Choose a rep, the week, and optionally a territory, then click Download report. You get Royal's own weekly report workbook, filled in from live data:
- Summary — sales value for the week and month to date against target, units sold by product type, and planned versus actual customer visits.
- Visit Report — every customer of the rep, one column per day, marking completed visits, with month-to-date and total visits.
- Pending Order — per customer: total ordered this month, how much was delivered, and the balance still pending.
- Target Prospects — the rep's customers with contact details filled in, ready for the rep to add opportunities, potential business and timelines.
- To Dos — the rep's follow-ups for the week (task, deadline, status, outcome), ready to add incentives, impact and risk.
The commentary sections (management support needed, next week's priorities, the head's assessment) stay blank on purpose — they're the rep's and manager's judgement, not something the system should guess.
Product Ads & Promo Popups product_adsNew
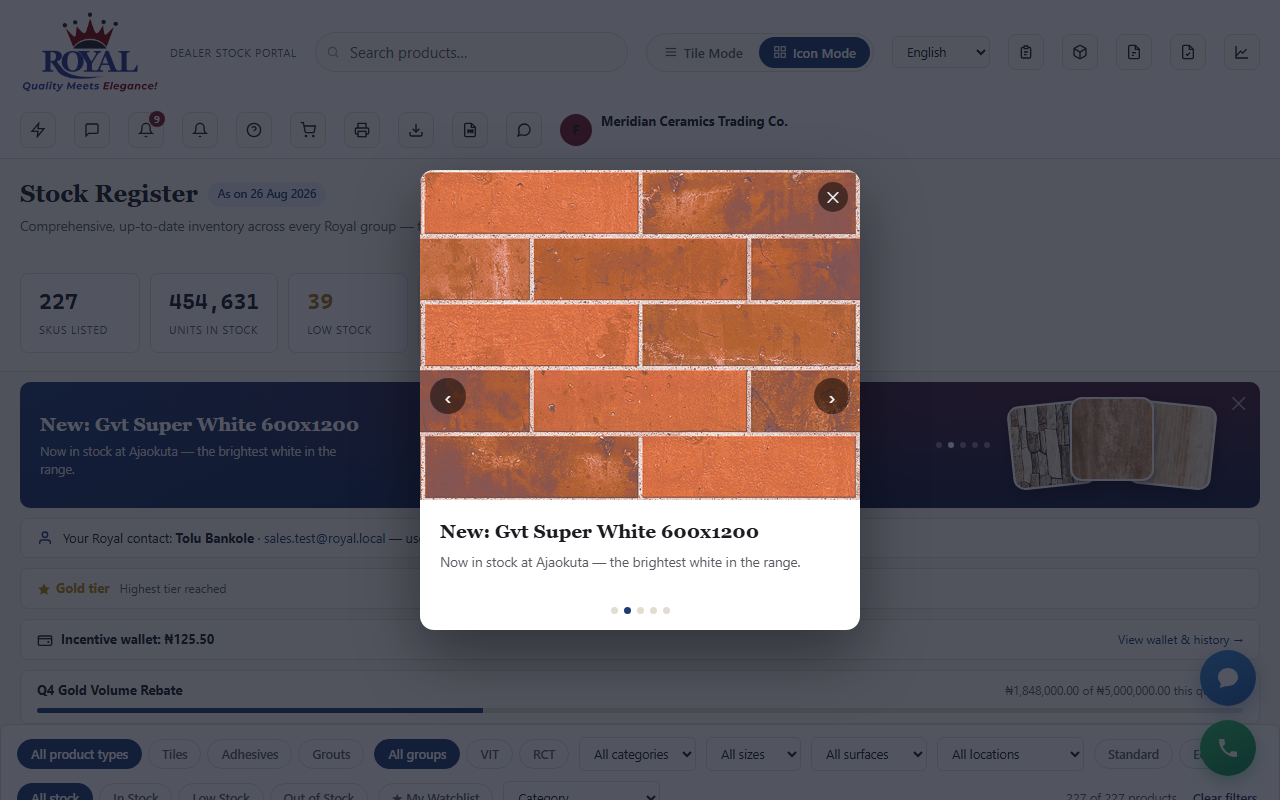
Product Ads lets you promote a new product or an offer with a picture (or short video), a headline and a button. You choose where each one appears: the dealer portal, the public catalog, a one-time popup when a dealer opens their portal, and/or the banner across the top of their dashboard.
add an ad
- Go to Product Ads and click + Add slide.
- Type a Headline, a line of Body text and the Button label, and upload a picture or short video.
- Tick where it should show — Portal, Public catalog, Popup, Banner — and make sure Active is ticked.
- Click Add slide.
Marketing Resources marketing_resourcesNew
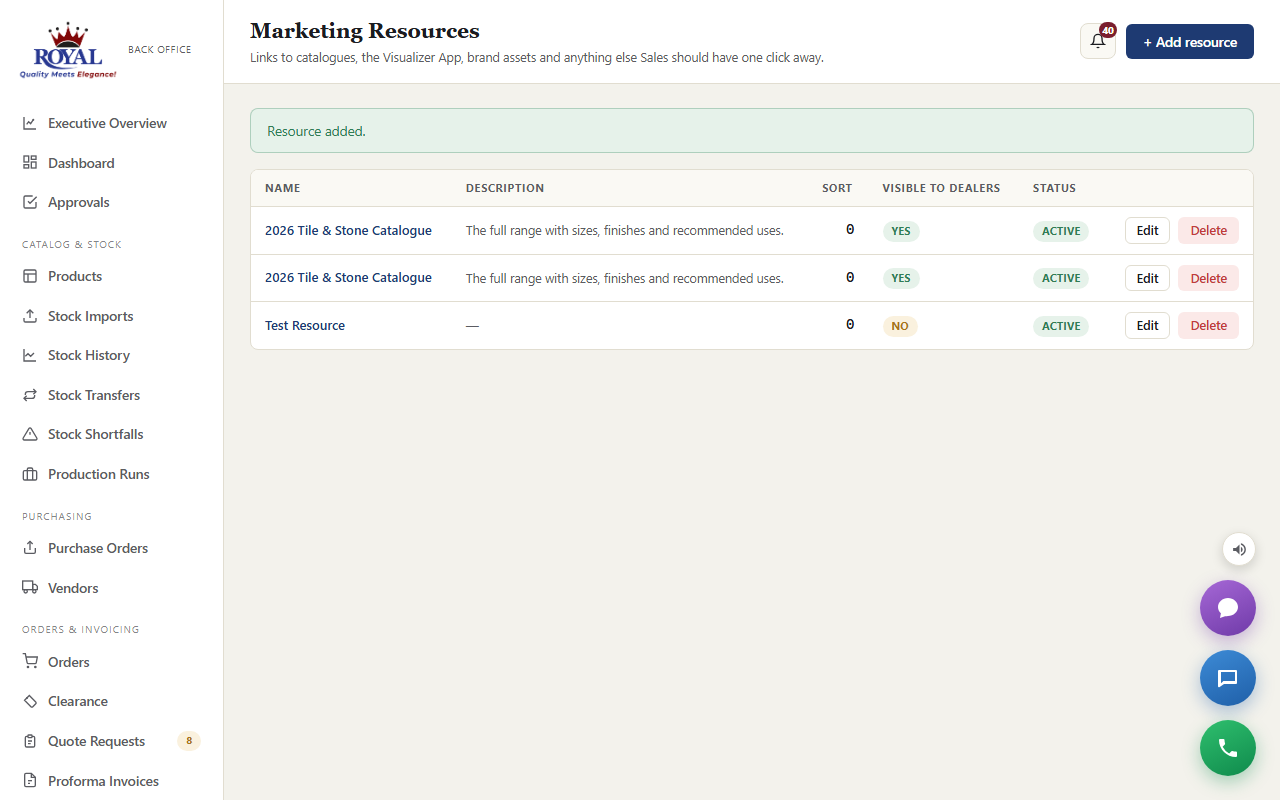
Catalogues, brochures, the Visualizer App — anything you want dealers to use with their own customers. Add each one once and it appears on every dealer's Marketing Resources page.
add a resource
- Go to Marketing Resources and click + Add resource.
- Give it a Name, paste the Link (a web page, a shared PDF, an app store page) and add a short Description.
- Click Add resource.
Incentive Schemes incentive_schemesNew
An incentive scheme rewards dealers who spend past a threshold in a period — for example, Gold dealers who spend ₦5,000,000 in a quarter get 2% back. When each period closes, the reward is credited automatically to the dealer's incentive wallet, and they can put that balance towards any unpaid order.
create a scheme
- Go to Incentive Schemes and click + Add scheme.
- Name it, pick the Dealer tier it applies to, the Qualifying period (monthly, quarterly or yearly) and the Threshold they must spend.
- Choose the Reward type — a percentage of what they spent, or a fixed amount — and its value.
- Click Add scheme.
Public Catalog & Quote Requests public_catalogNew
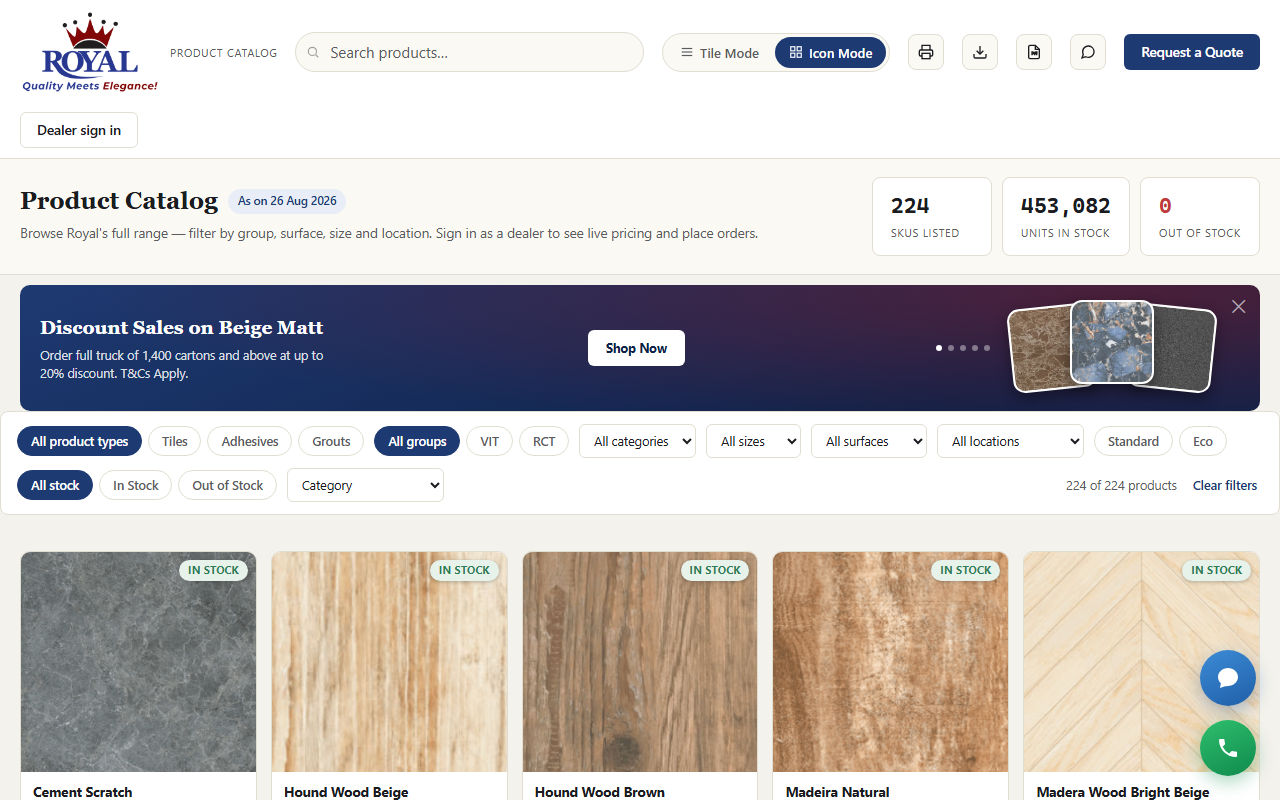
The public catalog is the range on the open web — photos, sizes and finishes, no prices and no stock levels, no login needed. Its address can be shared, put on adverts, or linked straight to a filtered view or a single product. Visitors who like what they see click Request a quote, and their request lands in Leads immediately, ready for a rep to follow up.
Team Chat internal_chatNew
The purple chat button in the bottom corner opens Team Chat: direct messages and group channels with colleagues, without leaving the page you're working on. Messages arrive live; if the chat is closed you get an unread badge, and a green dot shows who's online right now (user_presence).
message a colleague
- Click the chat button, then + New.
- Pick the colleague from the list.
- Type your message and click Send.
Dealer Enquiries enquiry_chatNew
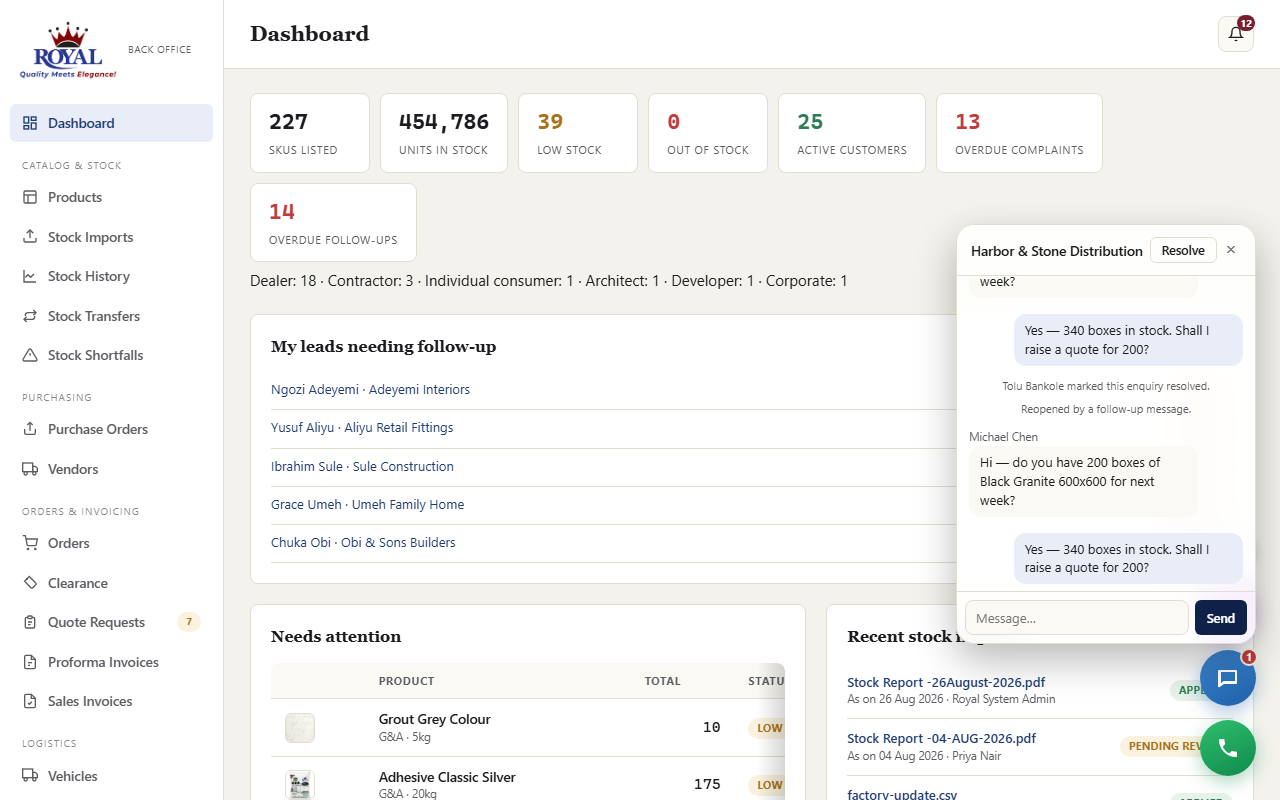
When a dealer (or a visitor to the public catalog) sends a chat message, it arrives in Enquiries — the blue chat button. It's offered to the dealer's own account manager first, then to the wider sales team if it isn't picked up.
answer an enquiry
- Open Enquiries and click Claim on the conversation, so nobody else answers at the same time.
- Type your reply and click Send — the dealer sees it immediately.
- When it's dealt with, click Resolve. If the dealer writes again later, it reopens with you.
In-App Calling inapp_callingNew
The green phone button lets you call colleagues straight from the browser — pick them by name, no extension numbers to remember. Calls from dealers (their Call button in the portal) ring their account manager first. If you miss a call, it's listed under missed calls with who it was. You can also click ☎ Call on an order or dealer to dial their real phone number.
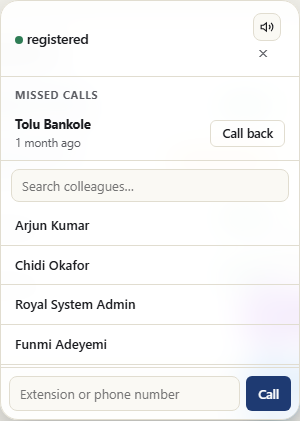
Your browser asks for microphone permission the first time. Signing out takes you out of the call queue automatically.
Notifications in_app_notificationsNew
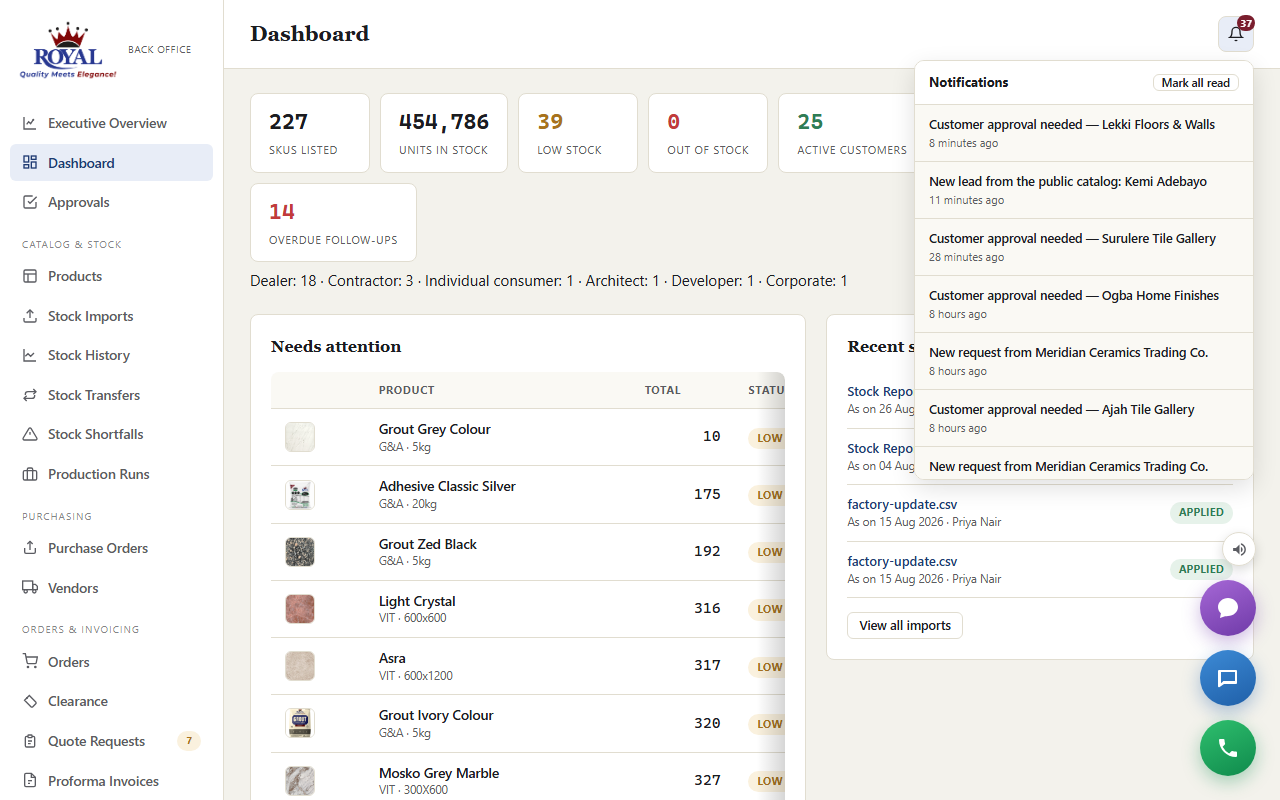
The bell at the top of every page lists your unread alerts — new orders and status changes, complaints, leads, approvals waiting on you, low stock and more — so nothing depends on checking email. Click one to go straight to it, or mark them all read. With push notifications on (push_notifications), the same alerts can pop up on your phone or computer even when the system isn't open.
Communication Logs communication_logsNew
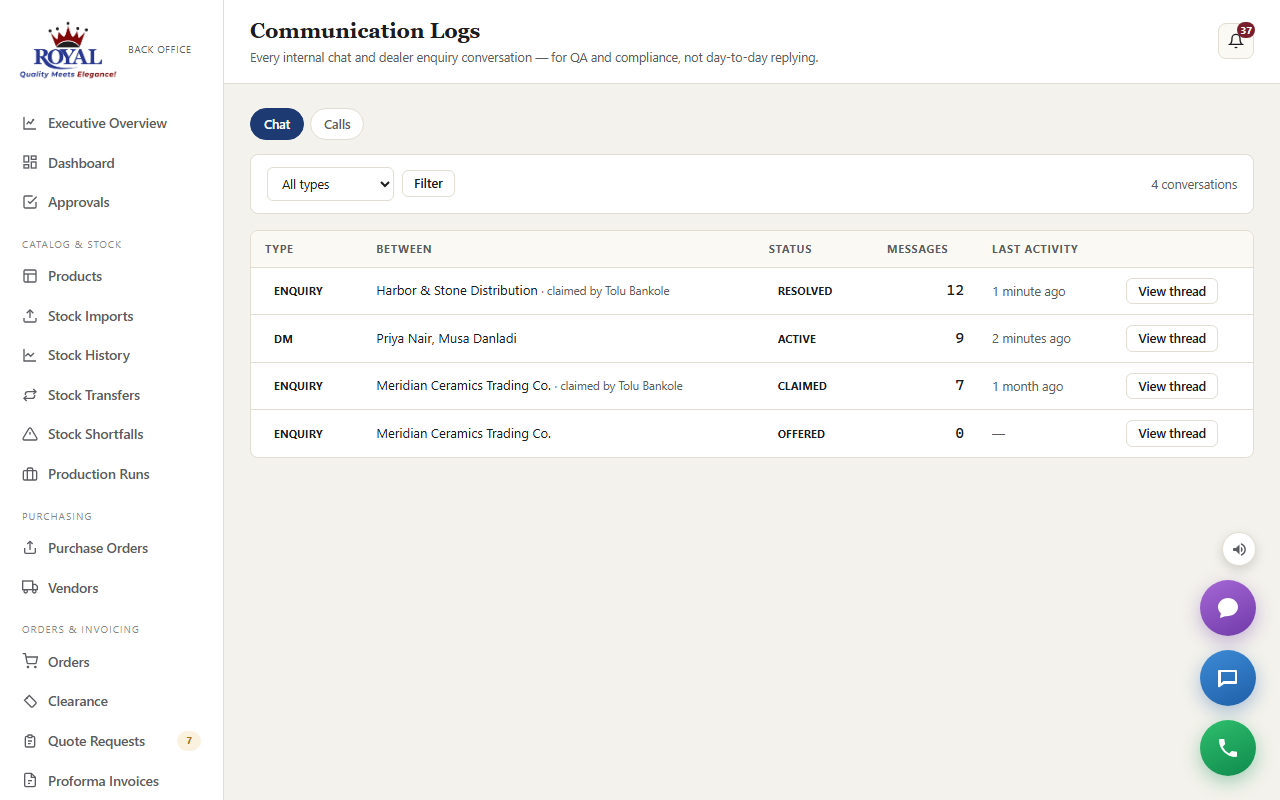
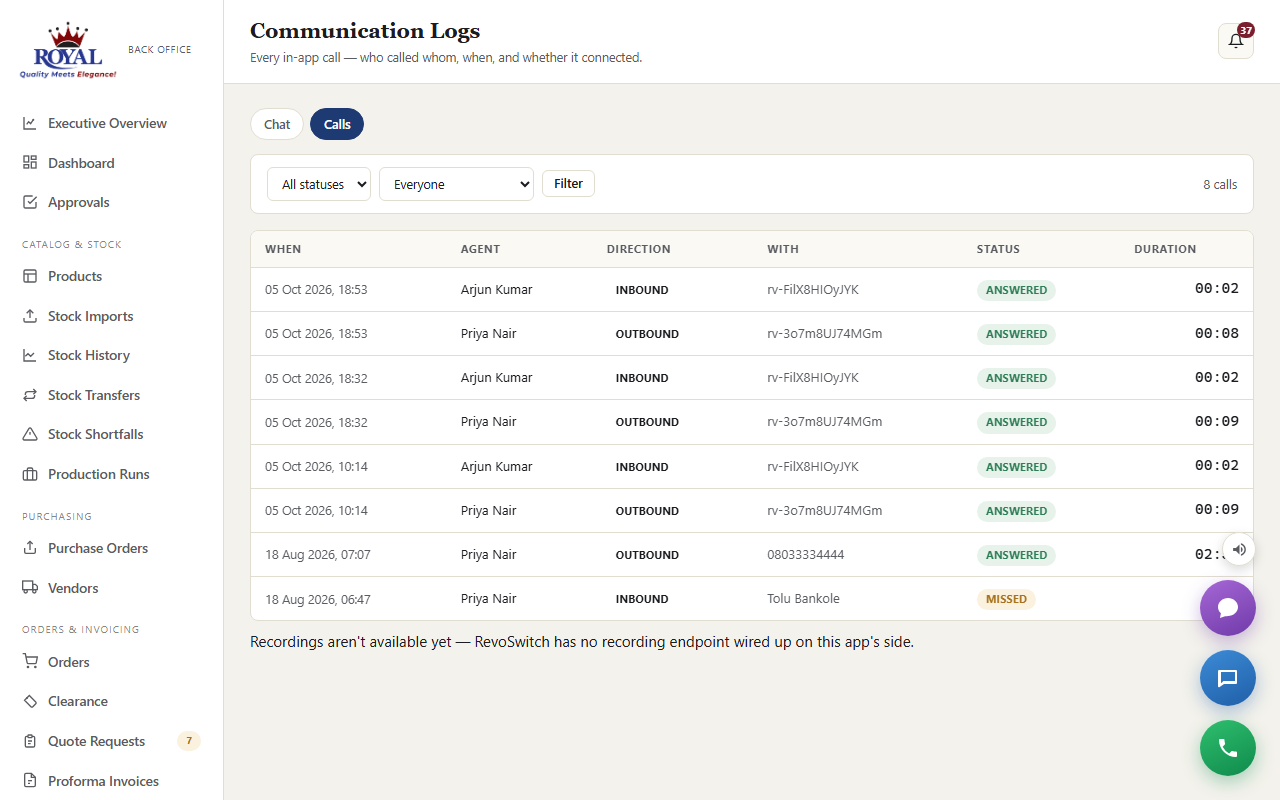
For Admins and Super Admins: Communication Logs shows every team chat and dealer enquiry conversation, and a log of every in-app call — who called whom, when, and whether it was answered, missed or declined — for quality checks and disputes.
Staff Accounts
add a new staff member
- Go to Staff Users and click + Add staff user.
- Enter their Name and Email.
- Choose a Role:
- Staff — manage products & stock, day-to-day operations.
- Admin — full access, including Executive Overview and other staff users.
- Super Admin — everything, plus system-level settings (only visible if you're a Super Admin yourself).
- Click Add staff user.
To remove someone's access, open their account and untick Active — this disables them without deleting their history, and can be reversed. You can't deactivate your own account, and only a Super Admin can change another Super Admin's role.
Roles, Departments & Approval Routing New
Two extra roles exist alongside Staff, Admin, and Super Admin, each tied to one of the approval workflows elsewhere in this guide:
set up a department and a reporting line
- Go to Departments and add whatever departments match your business (e.g. "Sales", "Warehouse", "Finance").
- Open a staff member's account, set their Department, and optionally who they Report to.
Securing Your Account (Two-Factor Login)
If your administrator has turned on Two-Factor Authentication, you can add an extra layer of protection to your own account — a code from an authenticator app, in addition to your password. This is optional per person, even once it's turned on system-wide.
turn on two-factor login for your own account
- Go to Security in the sidebar.
- Click Set up two-factor authentication — a QR code appears.
- Scan it with an authenticator app on your phone (any standard one works).
- Enter the 6-digit code the app shows you to confirm.
- Save the 8 recovery codes shown immediately afterward somewhere safe — this is the only time they're ever displayed.
You can generate a fresh set of recovery codes at any time, or turn two-factor login off entirely by re-entering your current password.
System Settings Super Admin only
One page controls the shared setup for the whole system: your company's name/email/phone/address (shown on exports and emails), the default low-stock warning level for brand-new products, outbound email and WhatsApp delivery details, your currency, and — if Order Stock Holds is on — how many hours a hold lasts before it releases automatically (1 to 720 hours). "Send test email" and "Send test WhatsApp" buttons let you confirm delivery is working without waiting for a real event to trigger it.
Turning Features On or Off Super Admin only
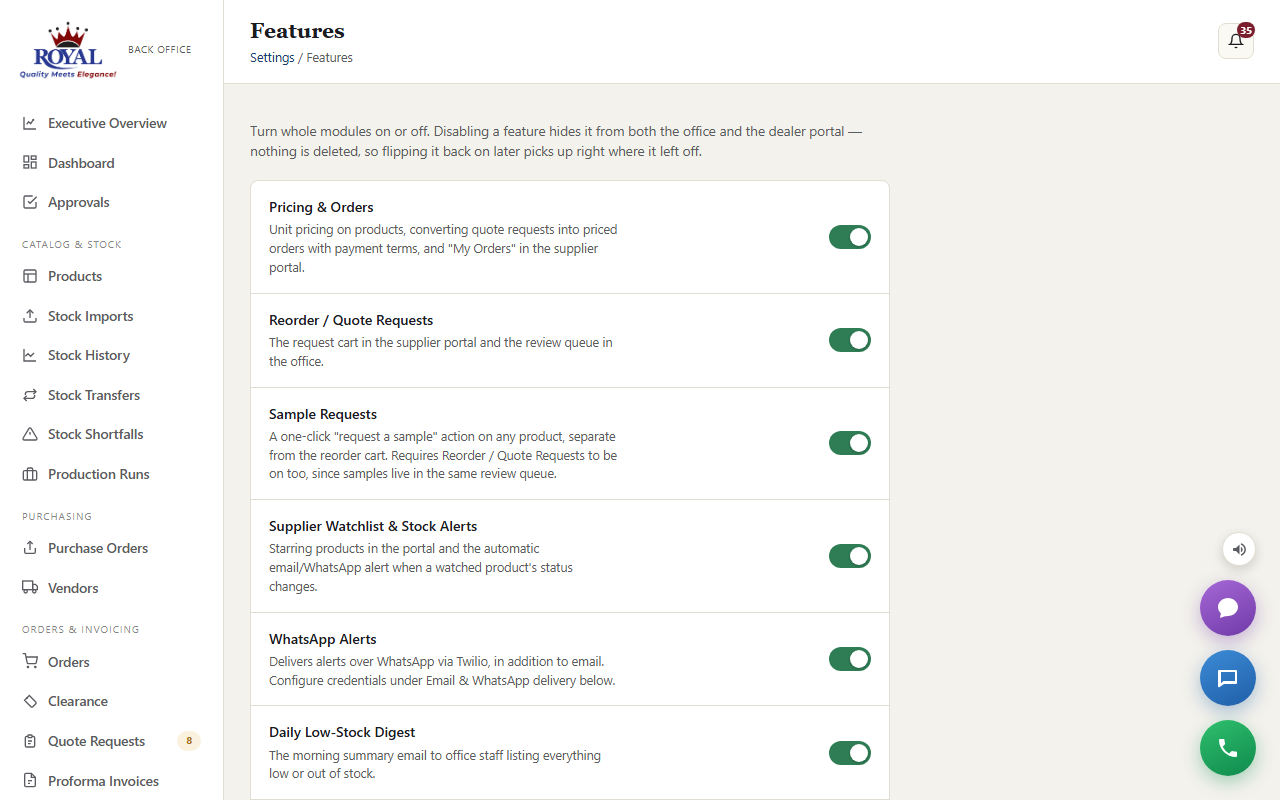
The Features page is a single switchboard listing every optional part of the system — pricing & orders, stock holds, warehouses & showrooms, two-factor login, WhatsApp alerts, multiple languages, and more — each with a plain-English description and an on/off switch.
Turning something off hides it from both portals — nothing is deleted, so switching it back on later picks up exactly where it left off. This is the safe way to try something out or roll it back if it's not needed yet.
Connecting Other Systems Super Admin only
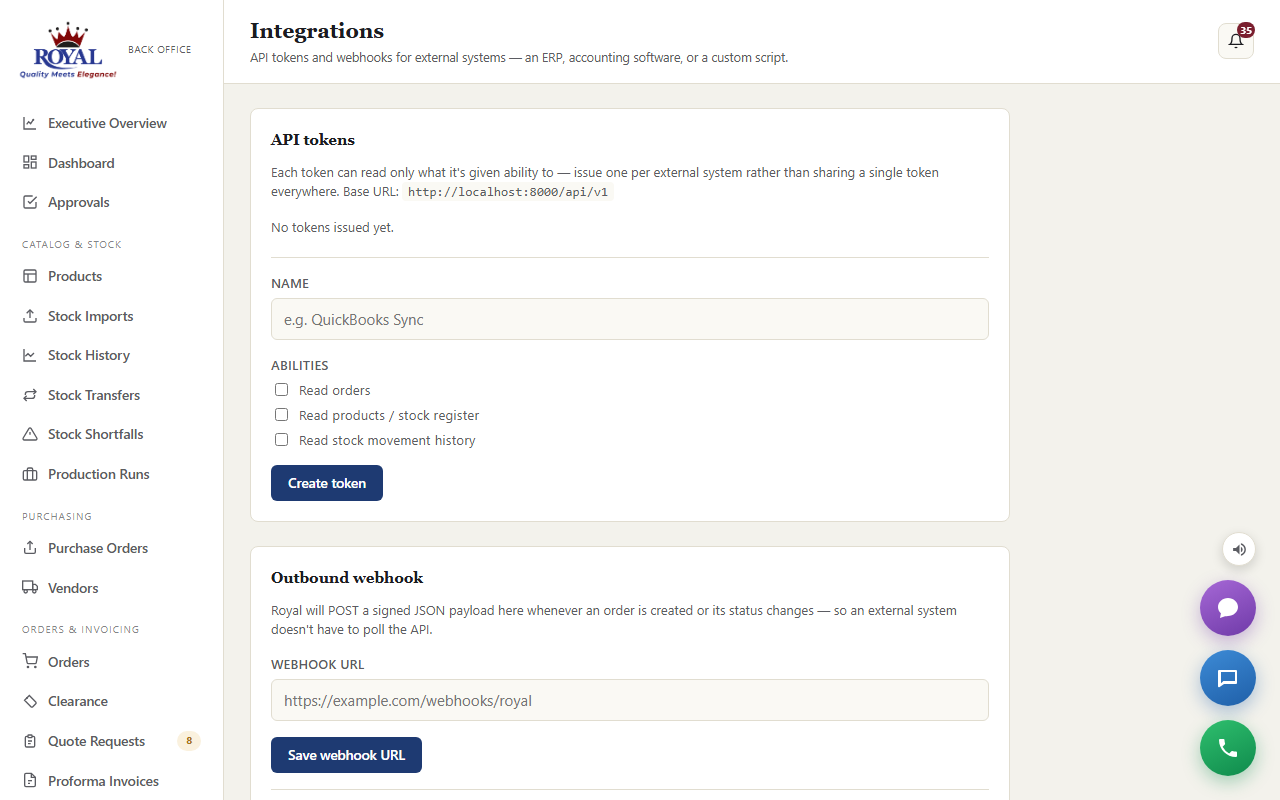
If Royal uses (or plans to use) an outside system — an accounting package, an ERP, or a custom script — to read data out of the stock register automatically, the Integrations page is where that access is granted.
- Access keys — create a named key and choose exactly what it's allowed to read (orders, products, or stock history). The key is shown once, right after you create it — copy it immediately, as it can never be shown again. Revoking a key takes effect instantly.
- Outbound notifications (webhook) — give the system one web address, and it will automatically notify that address whenever an order's status changes, so an outside system always has the latest information without you doing anything extra. A "send test" button lets you confirm it's working.
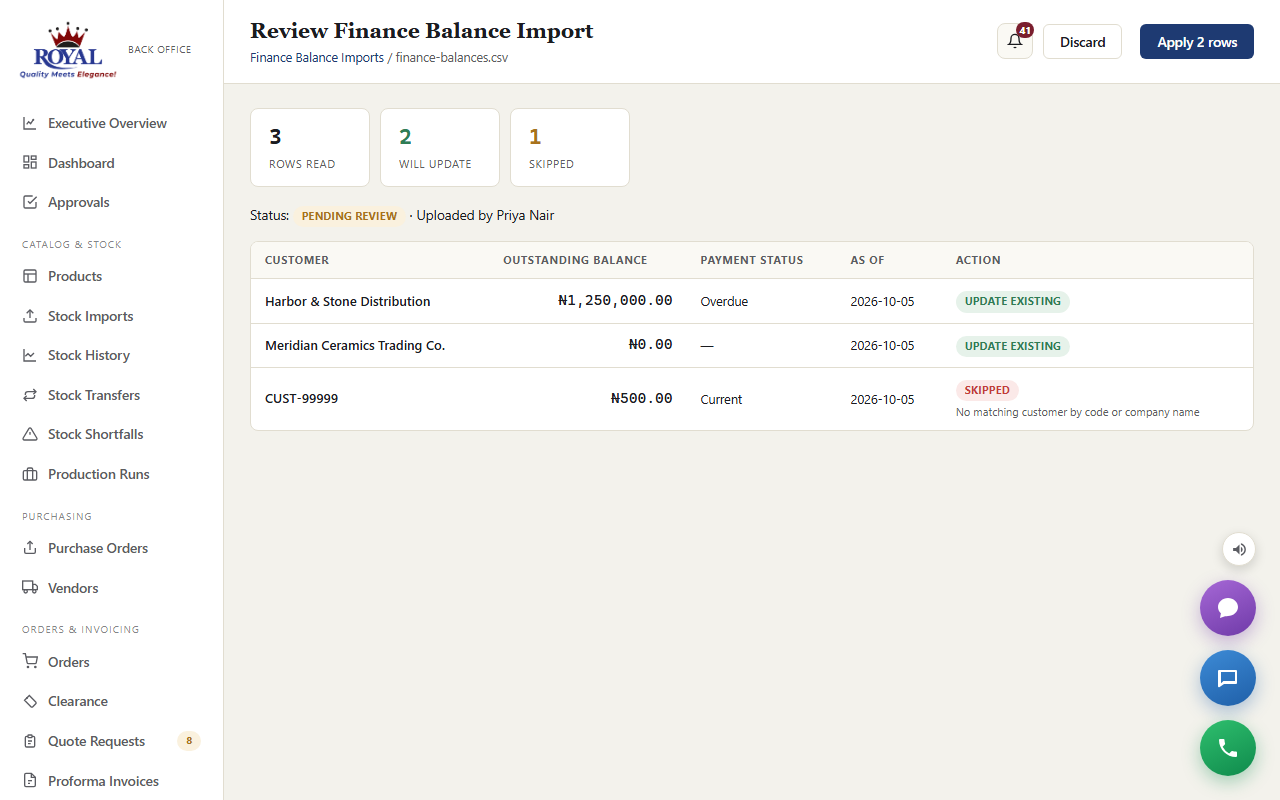
Finance Balance Import finance_balance_importNew
If Finance keeps customer balances in a separate accounting system, upload its export here so every customer's profile shows the same outstanding balance Finance sees.
import balances
- Go to Finance Balance Import and choose the file (CSV or Excel, one row per customer with their name or code and the balance).
- Click Upload & preview. Nothing changes yet — you see which customers were matched and which rows couldn't be matched.
- If it looks right, click Apply N rows (N being how many were matched) — or Discard to throw the upload away.
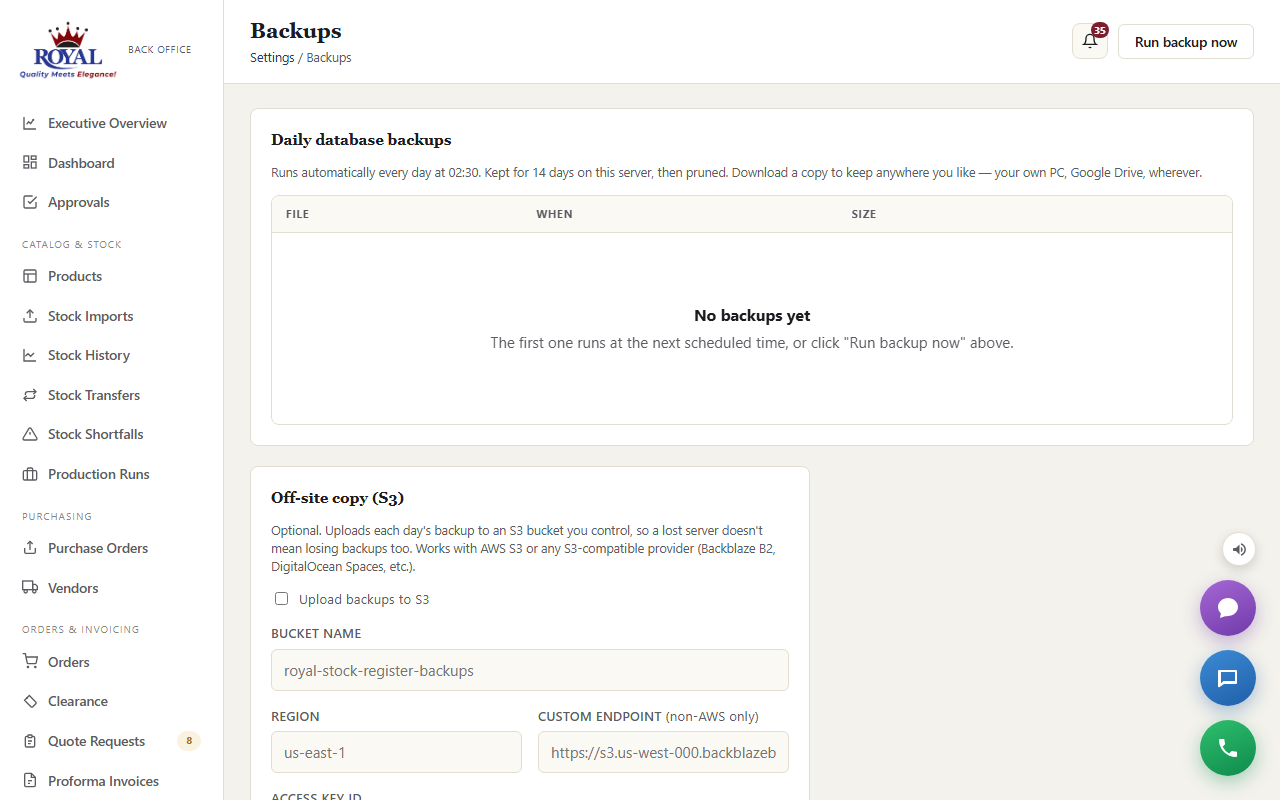
Backups Super Admin only
The system backs up its database automatically every night, and — once a storage bucket is set up on the same page — sends a copy off the server too. The Backups page (under Settings) lists every backup with its date and size; click Download to keep your own copy, or Run backup now before a big change such as a stock import.
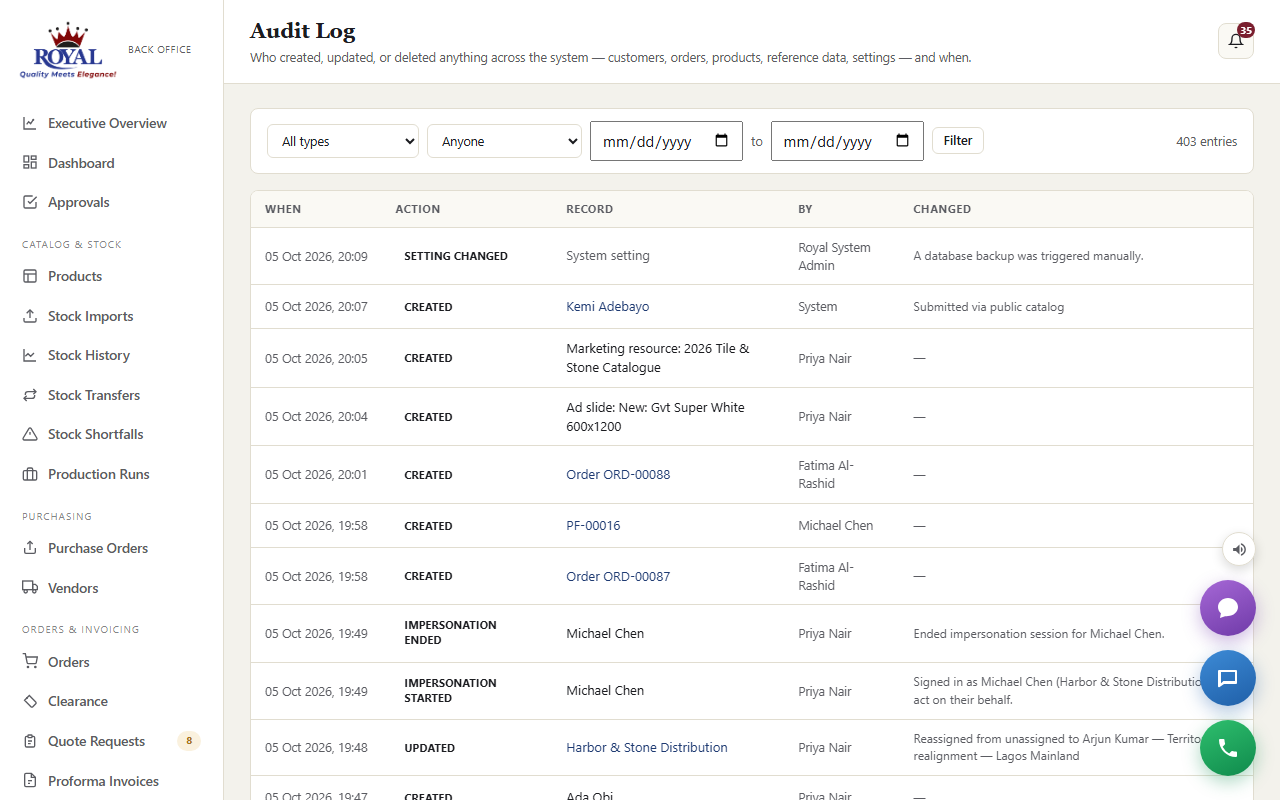
Audit Log audit_log
Every change anyone makes — a price, a stock level, an order status, a customer's details, a setting, a feature switched on or off — is recorded with who did it, when, and what it was before and after. Filter by person, by type of record or by date to answer "who changed this?" in seconds. Entries can't be edited or deleted.
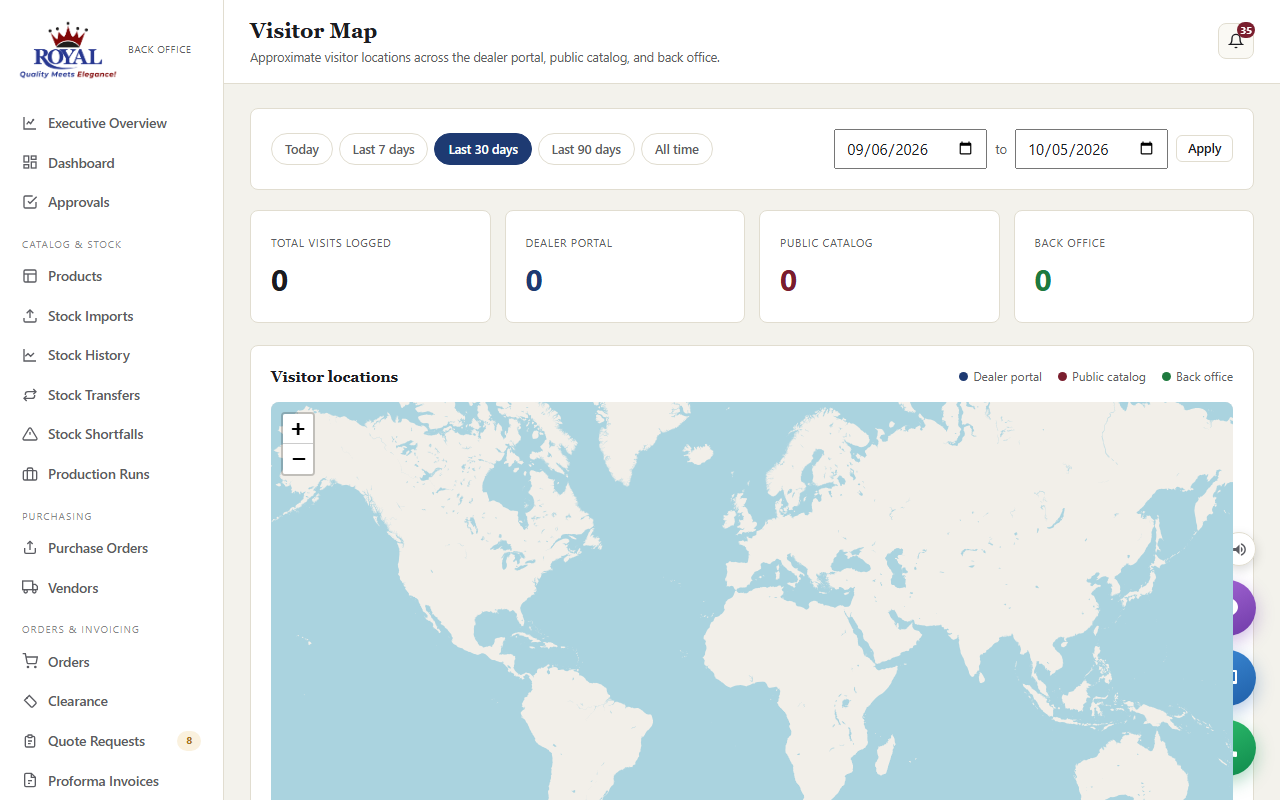
Website Visitors visitor_trackingNew
The Visitor Map shows who is looking at the public catalog and dealer portal: a map of where visits come from, which pages they viewed, and the device they used. Search-engine robots are filtered out, so the numbers are real people — useful for seeing whether an advert is working.
For Suppliers
Everything you need to check live stock, request quotes and samples, and track your orders with Royal.
Signing In & the Register
Once you sign in at /login, you land straight on the live stock register — the same numbers Royal's own staff see, updated the moment they change anything.
Depending on what Royal has enabled for your account, you may also see a card showing your named Royal contact, a loyalty status card, and buttons to add products to a request or star ones you want to track.
Tile Mode & Icon Mode
Two buttons at the top of the register switch how stock is displayed — this doesn't change what data you see, only how it's laid out, and it's just for you (nothing is saved between visits).
Both views share the same search box and filters: text search, product group, category, size, stock status, your watchlist, and a sort dropdown.
What the colours mean
Watching Products
Click the star (★) next to any product to watch it. From then on, if that product's quantity or status (In / Low / Out) changes, you'll get an email automatically — and a WhatsApp message too, if you've opted in (see Alerts & preferences). Click the star again to stop watching. Use the ★ My Watchlist filter to see only what you're tracking.
Requesting a Quote
send a reorder request to Royal
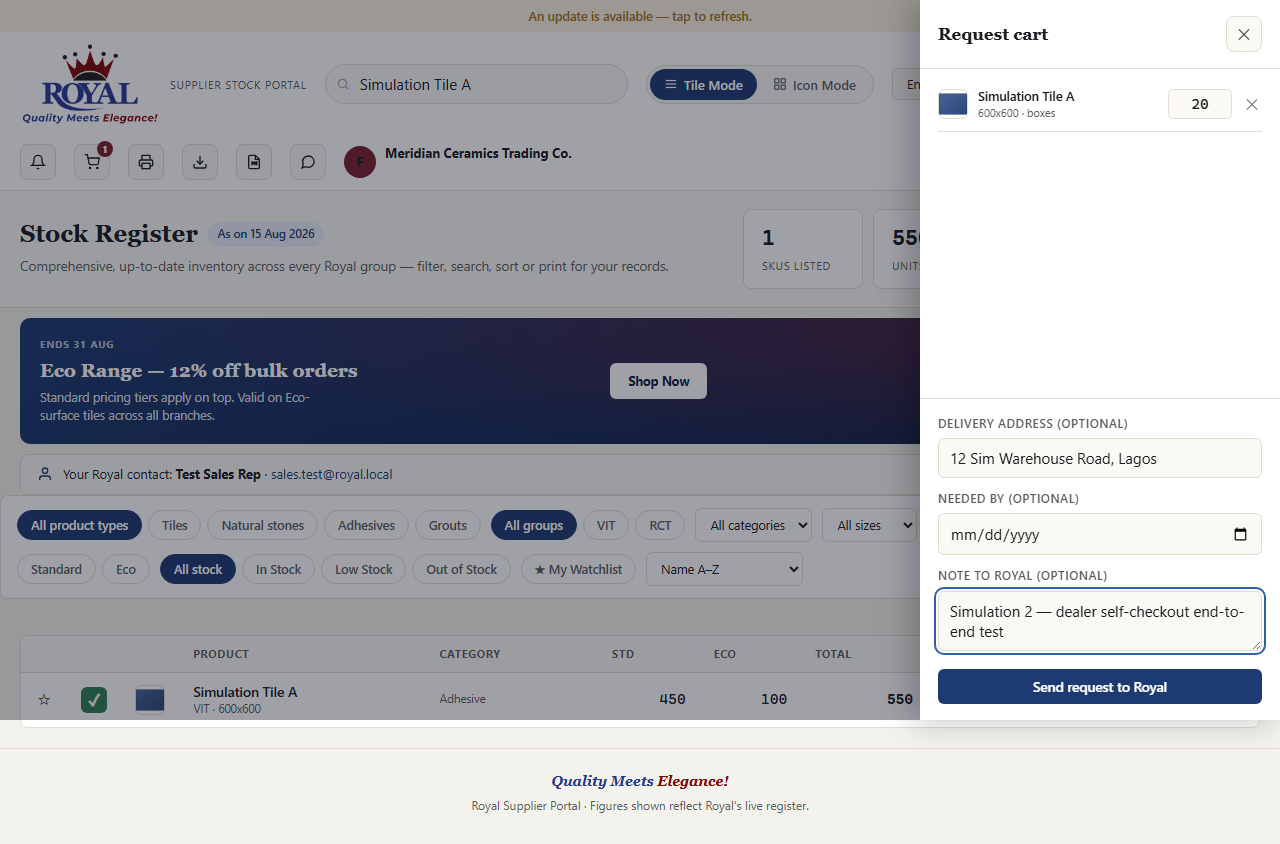
- Click the + button on any product row or card to add it to your cart.
- Open the cart (the cart icon at the top, showing how many items are in it).
- Adjust quantities or remove items as needed, and optionally fill in a Delivery address (blank uses your account address), a Needed by date and a Note to Royal (for example a project reference).
- Click Send request to Royal.
Instant Ordering (Self-Checkout) dealer_self_checkoutNew
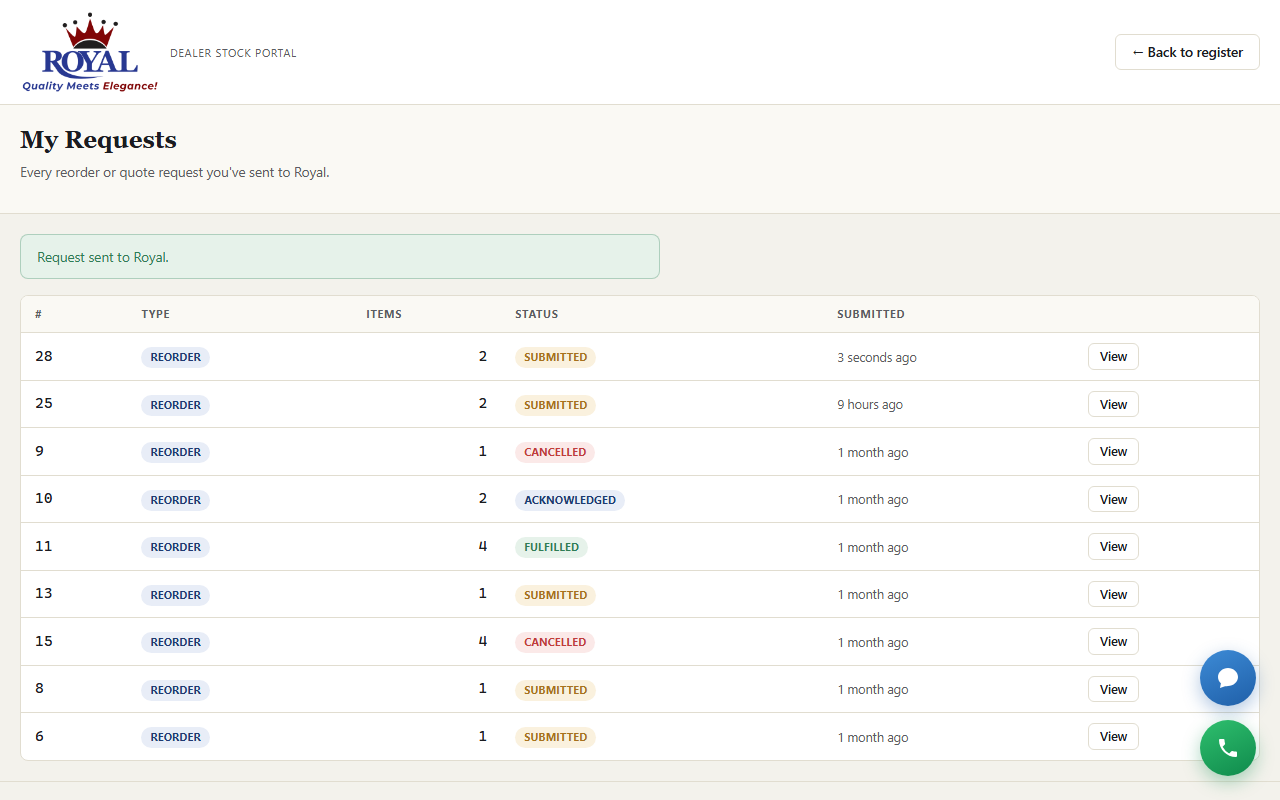
If Royal has switched this on for your account specifically, sending your cart skips the review queue entirely — it becomes a real, priced order immediately, with no wait for someone in the office to approve it first.
Self-checkout only works for accounts Royal has individually enabled it for, and only while every product in your cart is priced. If anything in your cart doesn't have a price set yet, your request quietly falls back to the normal review queue instead of failing outright — you'll never lose a request over it.
Everything after that point works exactly like any other order — the same status tracker, the same email and WhatsApp updates as Royal's office moves it through Confirmed, processing, dispatch, and delivery.
Requesting a Sample
Deciding on a large order and want to see the product first? Use the sample-request button (⚑) on any single product for a one-click, no-cart, one-item request — separate from your regular cart. It goes to Royal's same review queue, just tagged as a sample.
Your Orders & Tracking
The My Orders page lists every order on your account with its current status and full details — and you're notified by email (and WhatsApp, if opted in) every time Royal updates a status.
Open any order to see a visual progress bar across the top, showing exactly how far it's got:
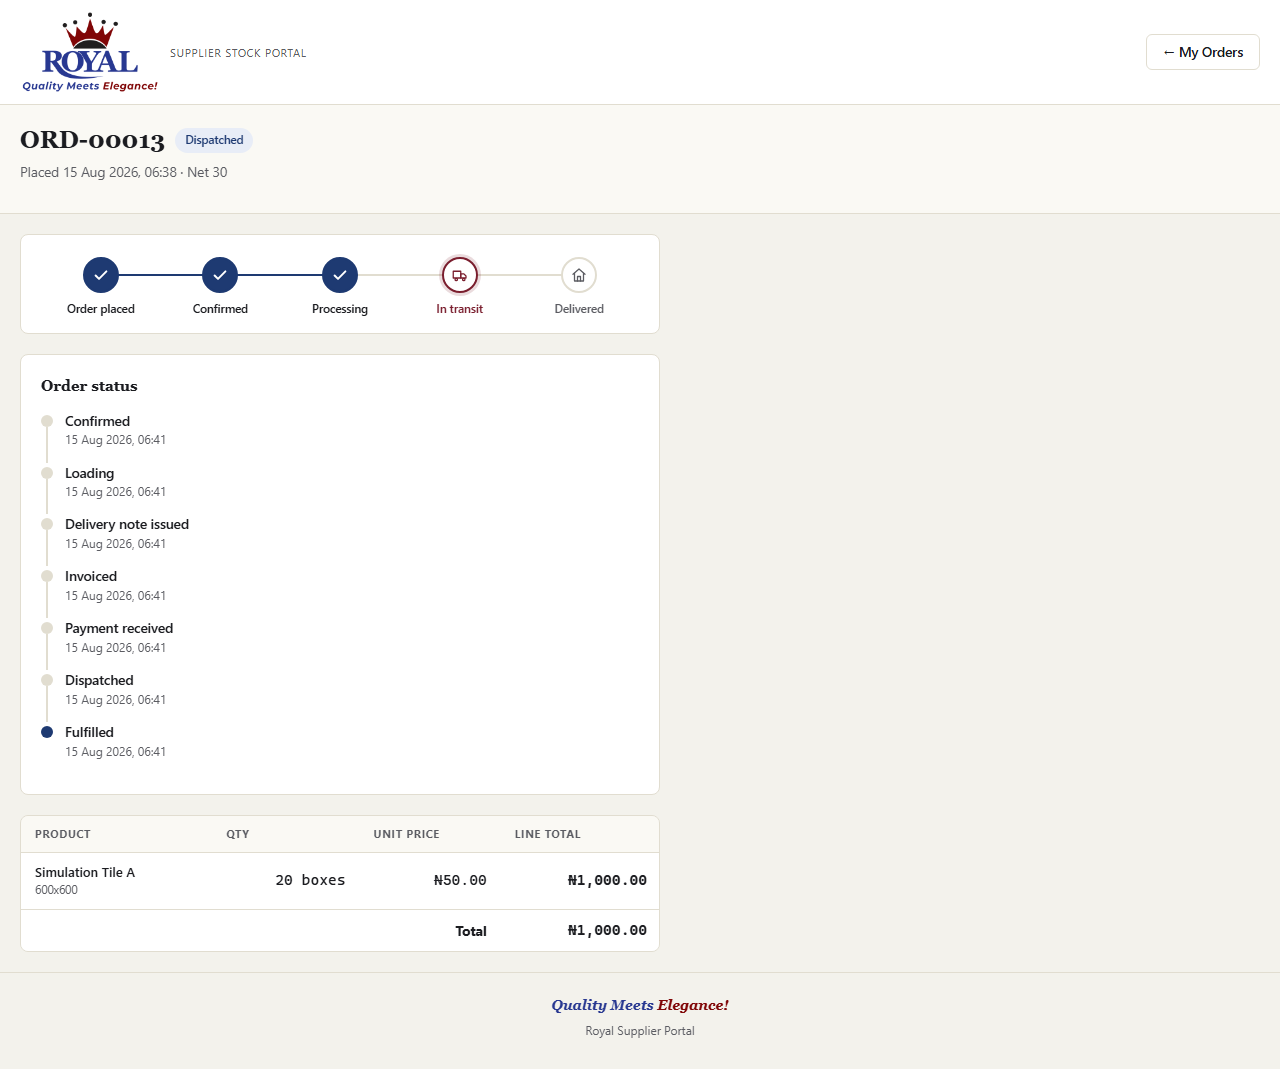
A step only ever checks off once it has genuinely happened — you'll never see "Delivered" light up ahead of the actual delivery. If an order is cancelled, the bar is replaced with a plain cancellation notice instead.
Payments, balance and invoices New
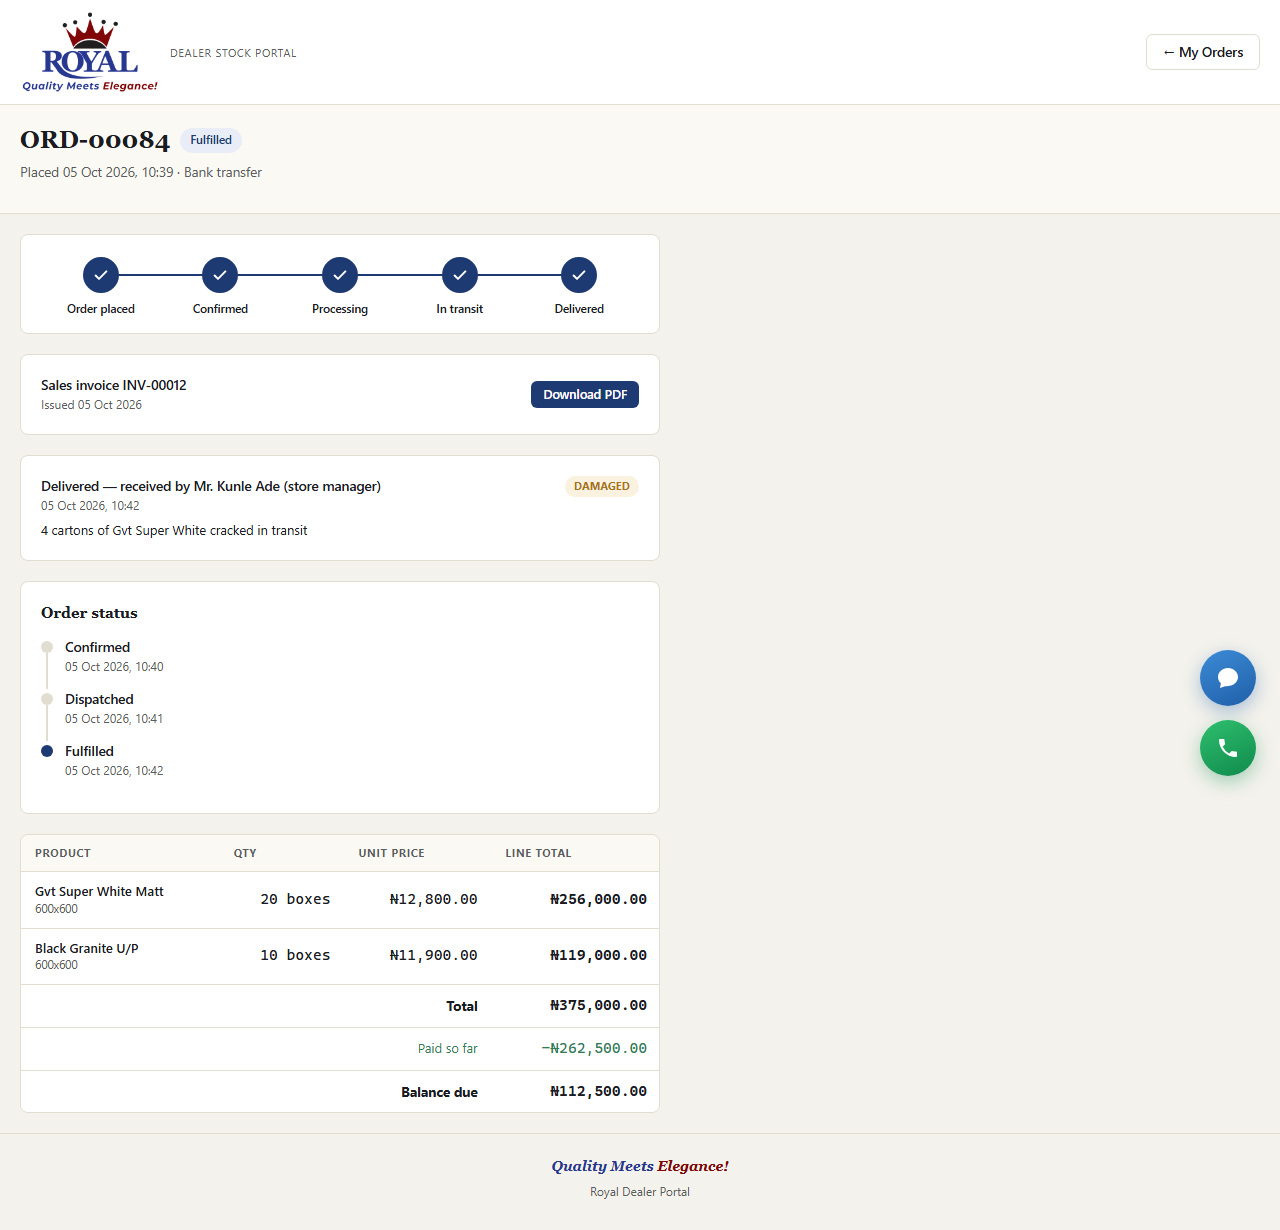
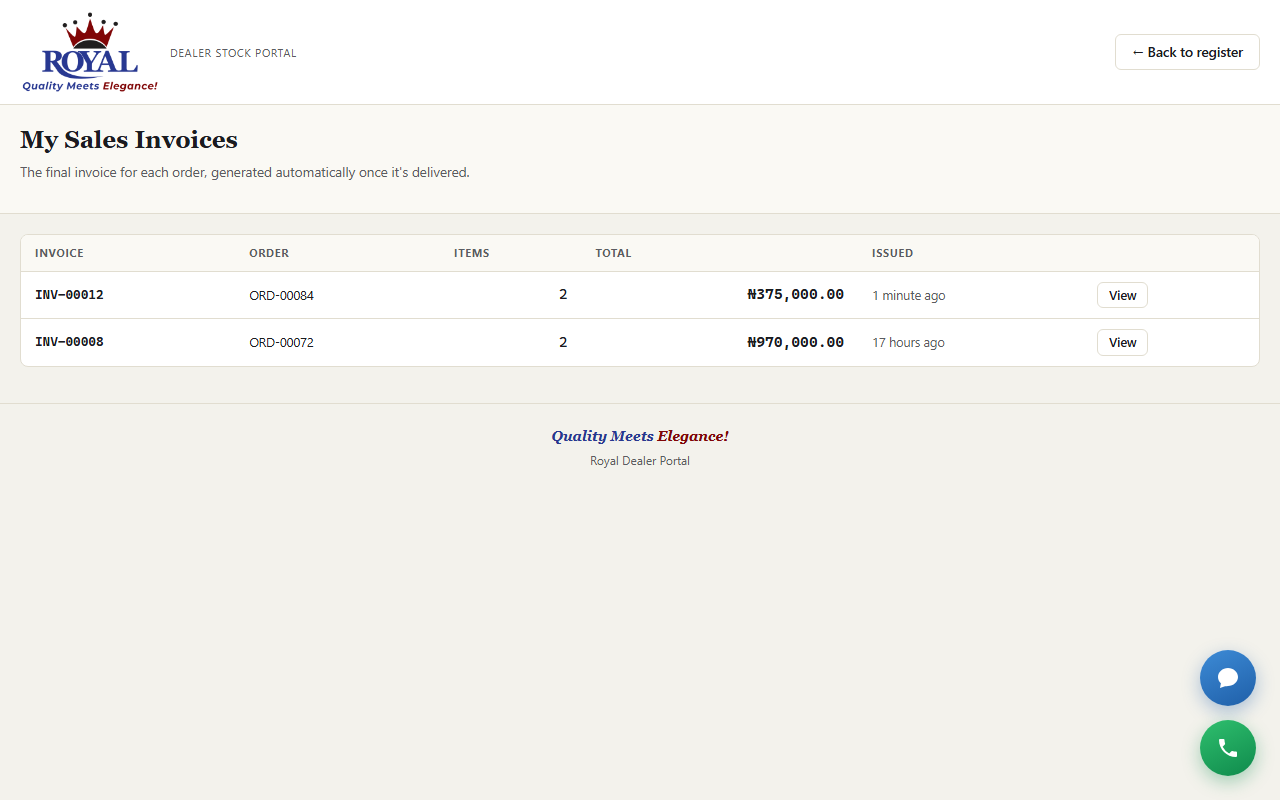
If you're paying for an order in instalments, the order shows each payment Royal has logged, what you've Paid so far and the Balance due. Once the order is delivered, its Sales invoice appears at the top with a Download PDF button — and every invoice on your account is listed under My Sales Invoices.
If you've earned incentive credit, a Pay with your incentive wallet box shows your balance and how much of it can go towards this order.
Complaints customer_complaintsNew
file a complaint
- Go to My Complaints and click New complaint.
- Choose a Type and write a Description — link an order if it's related to one.
- Click Submit.
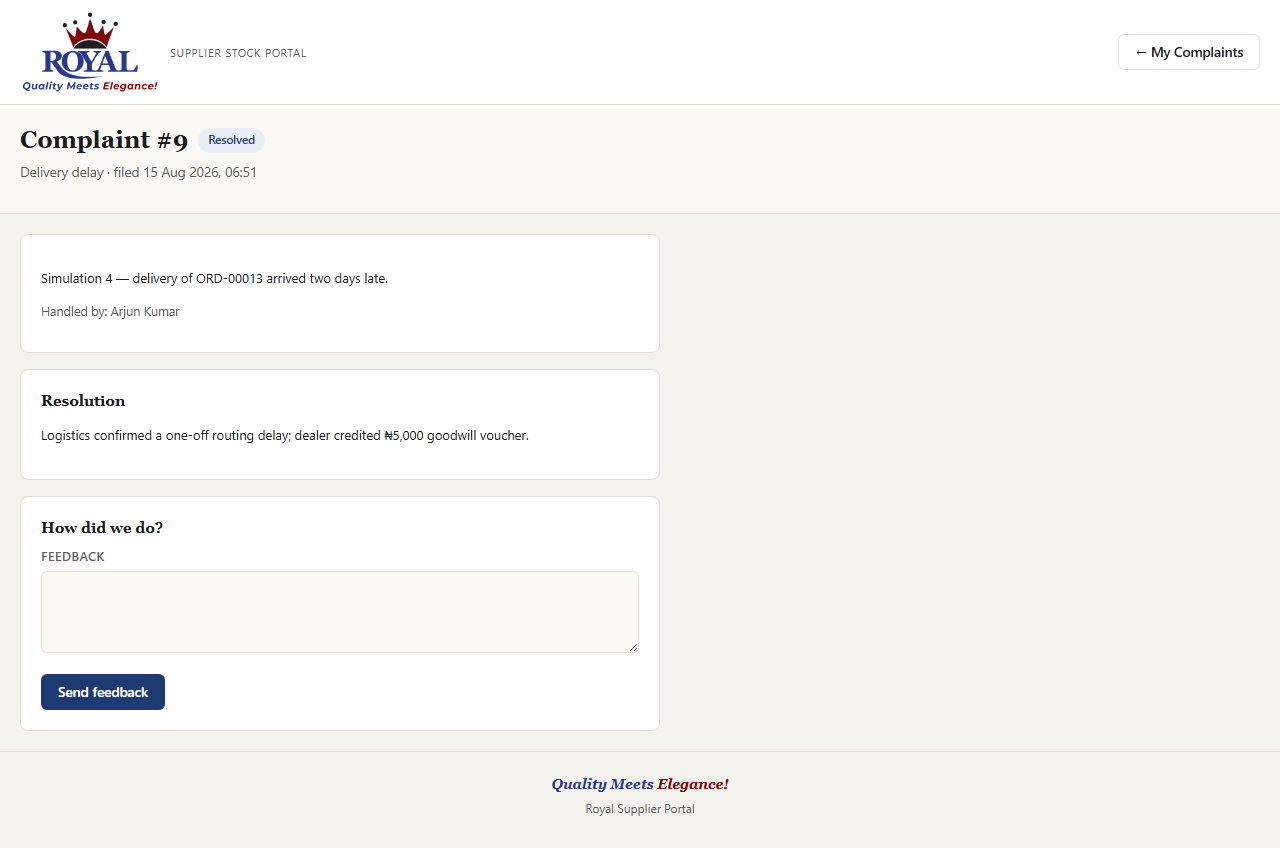
Once Royal marks a complaint Resolved and writes up what happened, opening it shows their resolution and unlocks a short "How did we do?" box — one piece of feedback per complaint, and it's the only time you're asked for it.
Alerts & Preferences
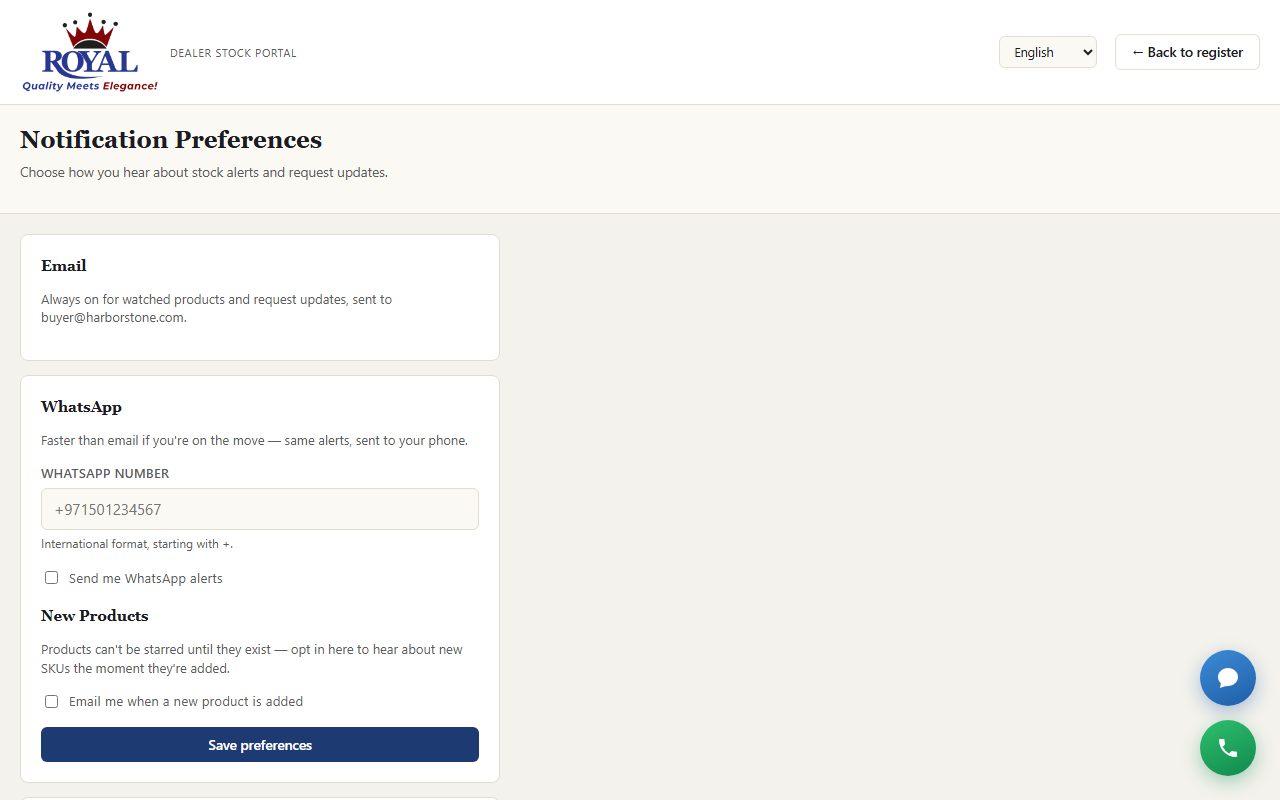
Email alerts (for watched products, requests, and orders) are always on for anything you're following. If Royal has WhatsApp alerts turned on, you can add that as a second channel:
turn on WhatsApp alerts
- Go to Notification Preferences (the bell icon).
- Enter your WhatsApp number in international format, e.g.
+2348031234567. - Tick the opt-in checkbox.
- Click Save preferences.
Push notifications on your phone or computer push_notificationsNew
On the same page, click Turn on push notifications and allow notifications when your browser asks. Order updates and replies then pop up on that device even when the portal isn't open. It's per device — turn it on on each phone or computer you use, and turn it off from the same button any time.
Changing Language
If Royal has multiple languages turned on, a language dropdown appears at the top of your screen. Choose from English, Arabic, Hindi, Hausa, Yoruba, Igbo, Spanish, French, Chinese, or Portuguese — Arabic automatically displays right-to-left. Your choice is remembered on your account for next time.
Translations are machine-generated. If something reads oddly, the English version is always the most precise — especially for anything important like order details.
Market Insights
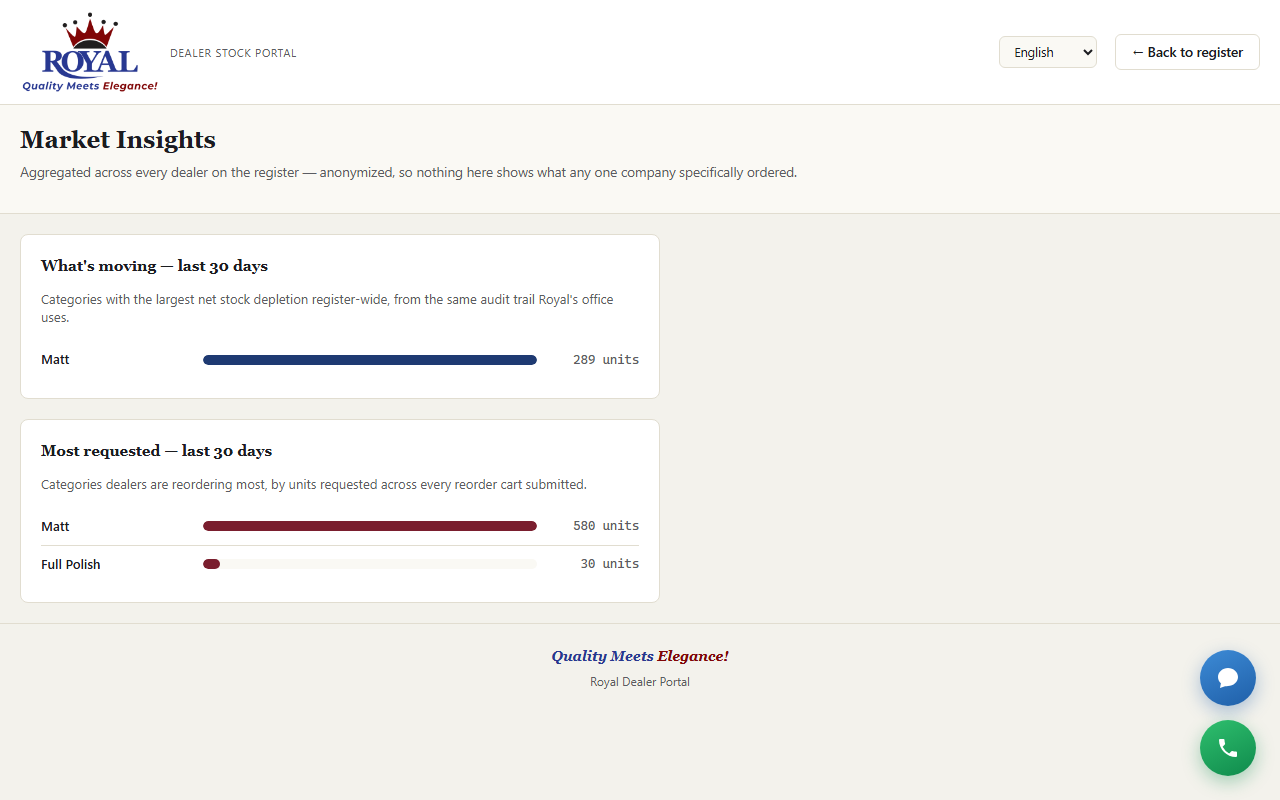
If enabled, this page shows general trends — which categories are moving fastest and which are getting the most requests — aggregated across all suppliers. Your own activity is never shown to other suppliers, and theirs is never shown to you individually.
Exporting the Register
A CSV export (matching whatever you currently have filtered) is always available for opening in a spreadsheet. If Branded PDF export is enabled, you can also download a formatted, Royal-branded PDF of exactly what's on your screen.
Proforma Invoices proforma_invoicesNew
Need a proforma for your bank, a client or your finance team before you order? Build one yourself under My Proforma Invoices.
create a proforma invoice
- Open My Proforma Invoices and start a new one.
- Use the filter box to find products, and enter a quantity for each one you want on it.
- Choose the payment terms, add any notes, and click Create proforma invoice.
- Download it as a branded PDF.
Your Wallets & Deposits deposit_walletNew
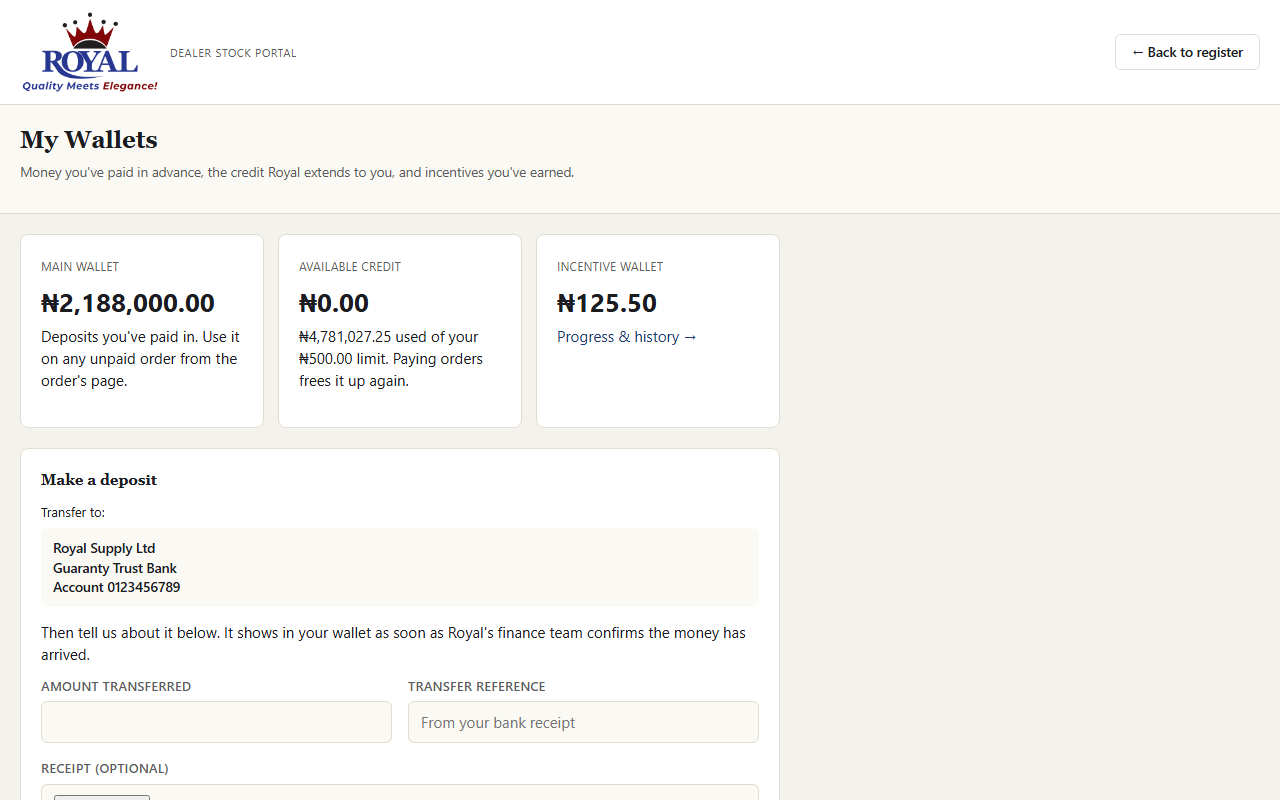
My Wallets (open it from the Main wallet line on your dashboard) shows three balances side by side:
- Main wallet — money you've paid Royal in advance, ready to spend on orders.
- Available credit — how much of your credit limit is still free. Paying orders frees it up again.
- Incentive wallet — rewards you've earned (see below).
make a deposit
- Transfer the money to the Royal account shown under Make a deposit.
- Enter the Amount transferred and the Transfer reference from your bank receipt. Attaching the receipt helps it get confirmed faster.
- Click Report deposit.
pay an order from your wallet
- Open the order from My Orders.
- Under Pay from your main wallet, keep the suggested amount (the whole balance, or as much as your wallet holds) or type a smaller one.
- Click Pay from wallet.
Wallet money is for orders only. If you need money back, speak to your Royal contact; Finance arranges refunds.
Incentives & Your Wallet incentive_schemesNew
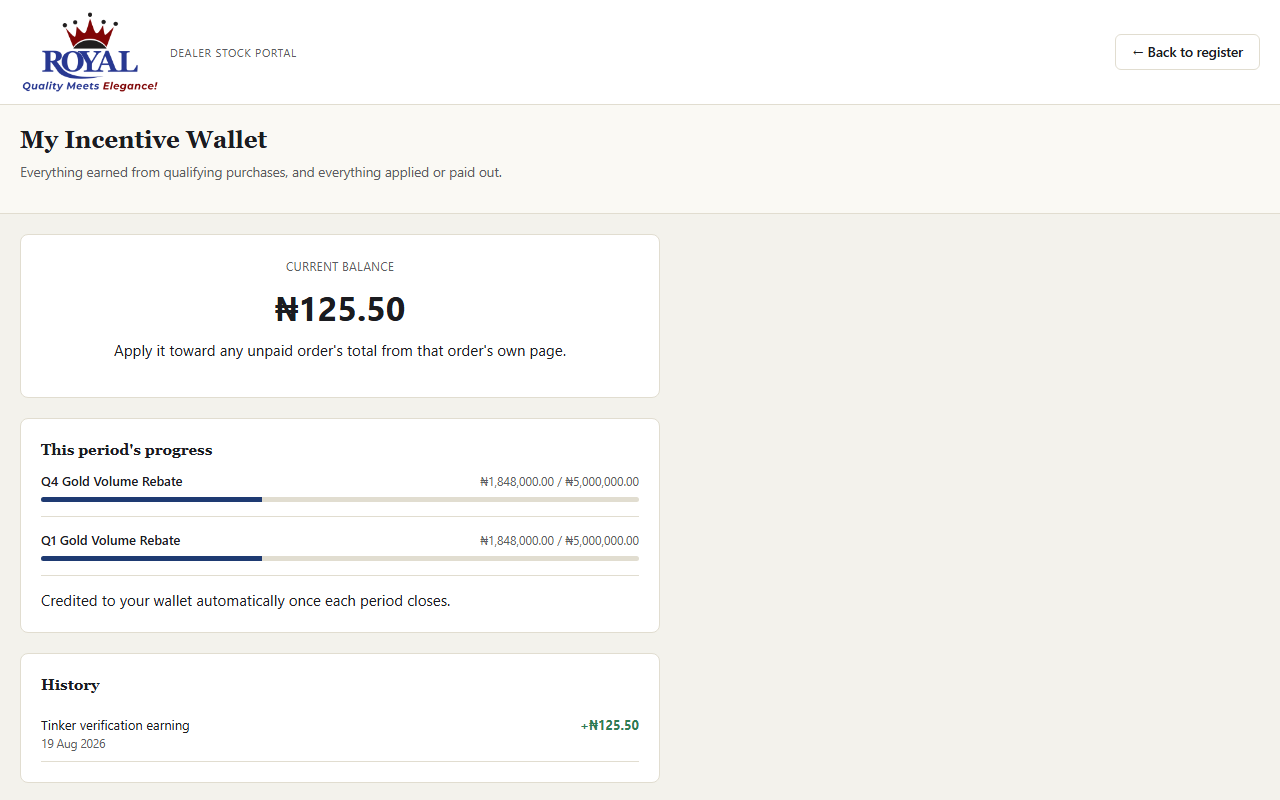
If Royal runs an incentive scheme you qualify for, My Incentive Wallet shows your progress this period, your current balance, and a full history of what was earned, applied or paid out. Earnings are credited automatically once each period closes.
To use your balance, open any unpaid order: a Pay with your incentive wallet box shows how much can go towards it — apply it and the order's balance drops straight away.
Marketing Resources marketing_resourcesNew
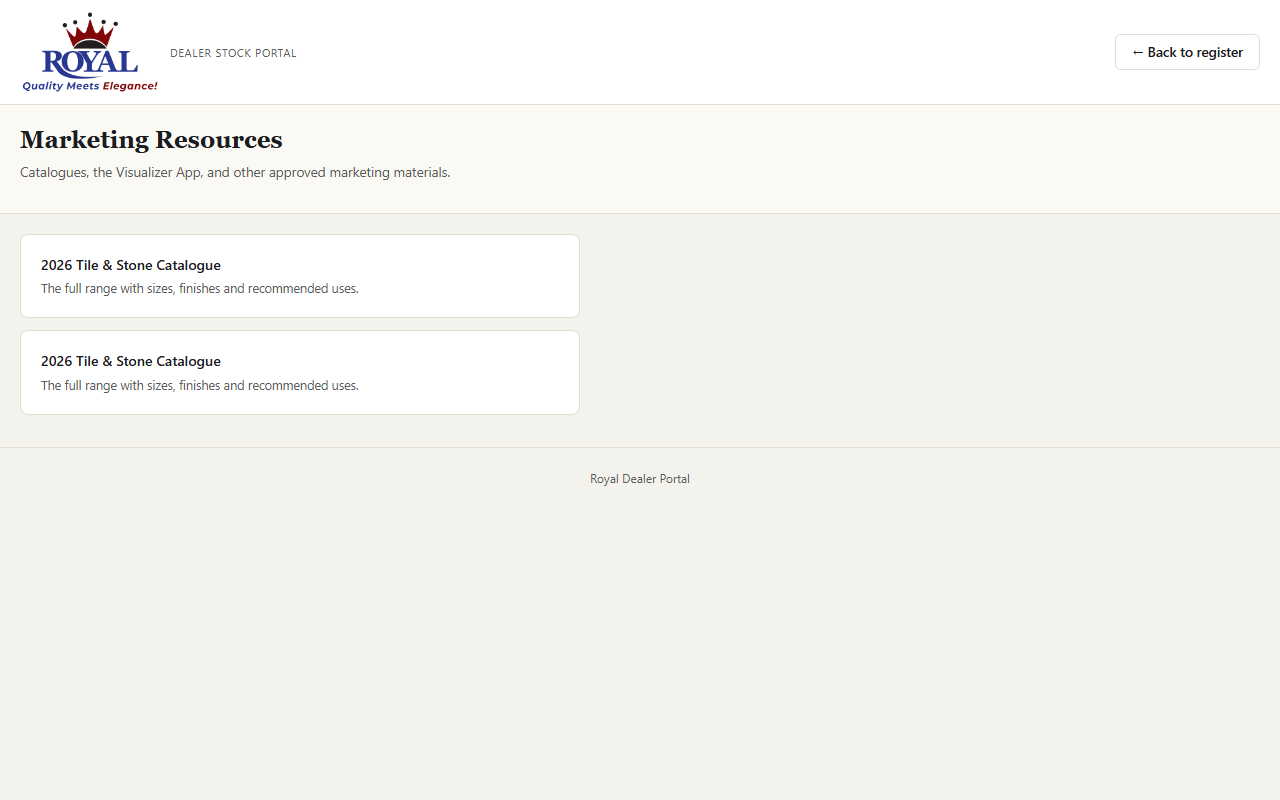
Marketing Resources collects Royal's approved catalogues, the Visualizer App and other materials you can use with your own customers — each one opens in a new tab.
Chat or Call Royal enquiry_chatNew
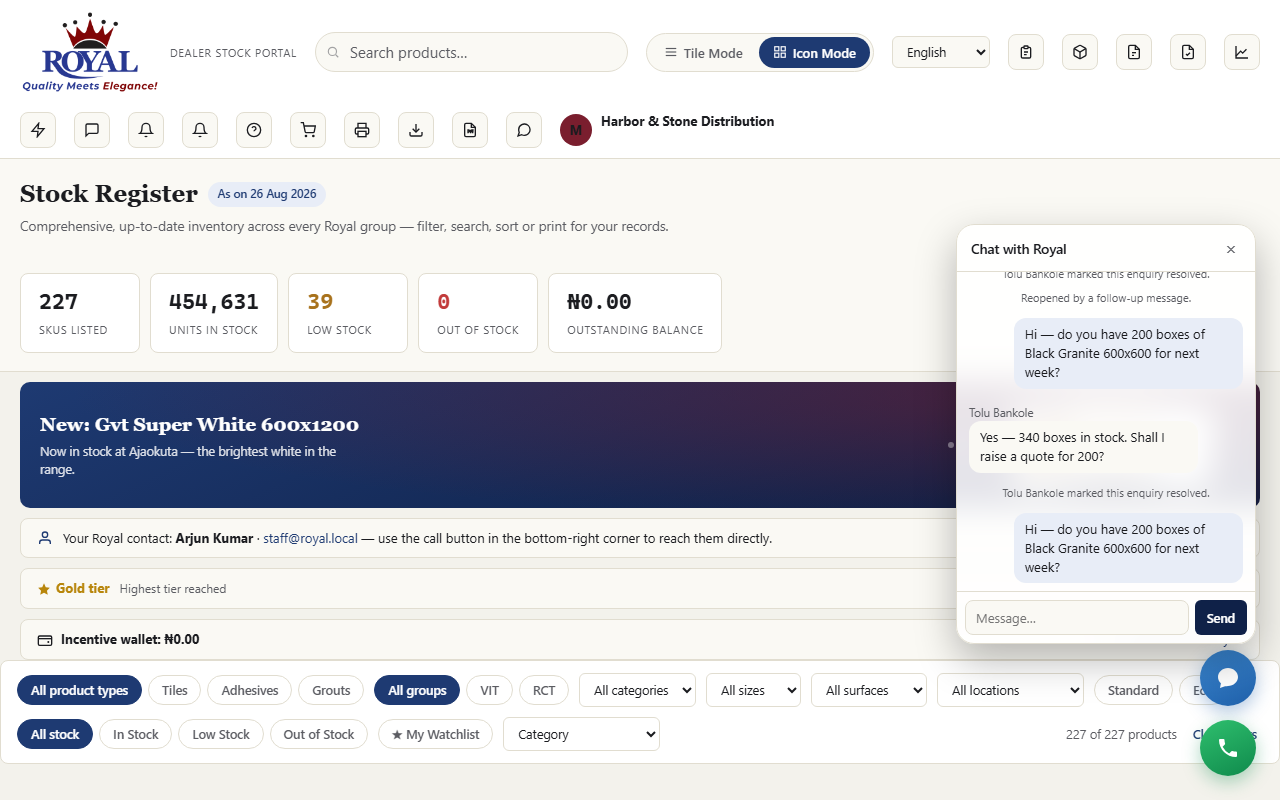
The chat bubble in the corner of the portal sends a message straight to Royal — to your own account manager first, and to the wider sales team if they're not available. Replies appear in the same window, live, and you're notified if you've closed it.
If in-app calling is on inapp_calling, a Call button rings your account manager directly from the browser — no phone number needed. If nobody answers, they see a missed call and get back to you.
Reference
Terms explained in plain language, a quick who-can-do-what table, and answers to common questions.
Glossary of Terms
- STD / ECO / G&A
- The three stock tiers Royal tracks for every product — Standard, Economy, and Grade A. A product's total is always these three numbers added together.
- In / Low / Out of stock
- A product's status, worked out automatically from its total: Out if there's none left, Low if it's below that specific product's own warning level, otherwise In stock. Every product can have its own warning level — it isn't one number for the whole catalog.
- Central Warehouse
- The default location every product's stock starts in. If you're using Warehouses & Showrooms, Central Warehouse always shows whatever hasn't been specifically moved to a named location — it's worked out automatically and can't drift out of sync with the real total.
- In transit
- The state a transfer's stock is in between being sent and being confirmed received. It's held in a system location you never pick directly, and doesn't count toward either the source's or the destination's balance until someone confirms it arrived.
- Vendor
- A company Royal buys stock from — the opposite direction from a supplier, who buys stock from Royal.
- Purchase order (PO)
- A record of stock ordered from a vendor. Tracks what was ordered, what's actually arrived so far (which can happen across more than one delivery), and what it cost.
- Batch
- A logged delivery of a tracked product, with a received date and optional lot code, used to flag aging stock. A product's stock total isn't required to add up to its batches — batches are advisory, not a strict ledger.
- Stock hold
- A temporary reservation placed on stock the moment an order is accepted (confirmed), so it can't be promised to two people at once. It's released automatically if the order isn't completed in time, or turned into a real deduction once the order is fulfilled. If a hold has lapsed by the time the order is dispatched, it's re-taken automatically as long as the stock is still free.
- Available vs. physical stock
- When stock holds are active, suppliers see "available" stock — the physical count minus anything currently on hold — as the headline number, so what's shown is always genuinely obtainable. The STD/ECO/G&A breakdown always shows the real physical count.
- Quote request
- What a supplier sends when they add items to their cart (or request a sample) and submit it. It's a request for Royal to review — it isn't a confirmed order until Royal converts it into one.
- Order
- A confirmed, priced commitment — either created directly by Royal's office, converted from a supplier's quote request, or (if self-checkout is on for that account) created instantly from a supplier's own cart. It moves through stages: Pending, Confirmed, Loading, Delivery note issued, Invoiced, Payment received, Dispatched, Fulfilled (or Cancelled at most points) — see the order status tracker.
- Payment terms
- COD = cash on delivery. Net 15 / 30 / 60 = payment due within that many days of the order.
- Credit limit
- An optional cap on how much a supplier can have outstanding (ordered but not yet paid) at once. On its own, exceeding it only warns office staff — it never blocks an order outright, unless Credit Approval Workflow is also turned on, in which case it becomes a real hold Finance has to clear.
- Loading authorization
- The one hard gate before an order can dispatch — payment confirmed, credit clear, stock held, and any discount approved, all checked automatically. See Dispatch & loading authorization.
- Self-checkout
- An account-level setting that lets a specific supplier's cart become a real order instantly, with no office review step. See Instant ordering.
- Proforma invoice
- A formal quotation document, not a confirmed order — never affects stock or a supplier's real order history until you separately create an order for real.
- Partial payment
- Paying for an order in instalments. Each payment is logged against the order, and dispatch unlocks once the share paid reaches the minimum Royal has set.
- Sales invoice
- The final invoice for goods actually delivered, issued after the order is dispatched — unlike a proforma invoice, which is a quotation before the order.
- Proof of delivery (POD)
- The record that a delivery arrived: who received it, when, and any photo or note. It's what lets an order move to Delivered.
- Round trip
- A truck's full journey for one dispatch — loading, travelling, arriving, offloading and returning to base — each step timestamped so delays can be spotted.
- Production run
- One batch made in the factory, from draft through quality checks to completion, at which point the made quantity is added to stock.
- Backorder
- An order line that can't be filled from stock right now. Backorders are queued by allocation priority, so when stock arrives it goes to the right customers first.
- Lead
- A possible customer who has shown interest — a quote request from the public catalog, a phone call, a referral — but isn't a customer yet.
- Main wallet (deposit wallet)
- Money a dealer has paid Royal in advance. Finance confirms each deposit; the dealer then spends it on orders, where it counts as a payment.
- Incentive wallet
- A dealer's balance of earned rewards from incentive schemes, which they can put towards any unpaid order.
- Feature
- An optional part of the system that Royal's administrator can switch on or off for everyone — like Pricing & Orders, Stock Holds, or Multiple Languages. If something in this guide isn't on your screen, it likely just hasn't been switched on yet.
Who Can Do What
| Role | Can do |
|---|---|
| Dealer (Supplier) | Browse the register, request quotes and samples, order instantly if trusted with self-checkout, track their own orders, payments and invoices, build proforma invoices, file complaints, chat with or call Royal — strictly limited to their own company's information. |
| Staff | Day-to-day office work: products, stock, customers, orders, quote requests, imports, transfers, reports, complaints, follow-ups, proforma invoices, vehicles and drivers. |
| Sales | Their own customers only (the ones they manage): adding customers, logging leads, confirming or cancelling orders, requesting discounts, follow-ups, "Log in as" for their own dealers, and their own performance. |
| Sales Manager | All customers, plus approving or rejecting discount requests, reassigning account managers and the Performance comparison across reps. |
| Finance | Clearing credit holds, logging payments and instalments, confirming dealer deposits and refunds, and moving orders through Invoiced and Payment received. |
| Warehouse | Loading, delivery notes, dispatch and delivery; production runs and quality checks; requesting stock adjustments and uploading stock imports (an Admin approves both). |
| Logistics | Dispatch and delivery, vehicles and drivers, and the Transit Timeline. |
| Admin | Everything above, plus Executive Overview, approving new customers, stock adjustments and stock imports, managing staff accounts and reference data, the Audit Log and Communication Logs. |
| Super Admin | Everything, plus System Settings, Features, Integrations, Backups, overriding a failed loading authorization or production quality check (with a written reason), and granting the Super Admin role itself. |
Questions & Troubleshooting
"A feature I need isn't showing up."
Some features depend on another one being on first (for example, Stock Holds needs Pricing & Orders switched on too). Ask your Super Admin to check the Features page — it lists what each one requires.
"A product's Central Warehouse number looks wrong, even negative."
A negative number is a genuine signal, not a glitch — it means the named locations were collectively told about more stock than the product actually has. Fix it with a Stock Transfer, or by correcting a location's recorded count.
"I can't finish setting up two-factor login."
Double-check your phone's clock is correct and set automatically — the codes are time-based, and even a small clock drift will make every code look wrong.
"I never got a WhatsApp alert."
Three things all need to be true: Royal's WhatsApp delivery must be switched on and correctly configured, and you personally need both a WhatsApp number saved and the opt-in box ticked on your Notification Preferences page.
"A transfer I initiated doesn't show up at the destination."
That's expected until someone confirms it — transfers hold stock "in transit" between initiation and confirmation. Check the In transit filter on Stock Transfers and confirm receipt once the stock has actually arrived.
"An order won't move to 'Fulfilled'."
If Stock Holds is on, fulfilling is blocked when the physical stock on hand can no longer cover what was reserved (for example, if it was corrected downward afterward) — nothing is partially deducted. Check the product's current STD/ECO/G&A numbers against what the order needs.
"Daily emails (low-stock summary, reminders) never arrive."
These run on a schedule behind the scenes — if they've stopped, ask whoever manages your server to confirm the scheduled task is still running.
"An order won't move to 'Dispatched'."
Open the order and check the loading authorization checks it lists — payment, credit, stock, and discount. Whichever one hasn't passed is named explicitly rather than a generic error. A Super Admin can override with a written reason if it's genuinely urgent.
"Dispatch says '✗ Stock held' even though we have the stock."
The order's reservation either lapsed or was never taken. Just dispatch again — the system re-reserves it automatically when enough free stock exists. If it still fails, other orders have reserved that stock in the meantime; the order page says so, and you'll need more stock or a Super Admin override.
"A dealer says they can't see a new feature in their portal."
Check the feature is switched on under Features. Dealers only see the parts of the portal they need, so some office features (production, fleet, reports) never appear for them.
"A chat or call won't connect."
Both need an internet connection that allows live updates, and calls need microphone permission in the browser. Reload the page; if the colleague still doesn't appear in the directory, check their account is active and, for calls, that they have a calling extension.
"I approved a discount but the order still won't dispatch."
Loading authorization checks payment, credit, stock, and discount independently — an approved discount clears only that one check. Look at the same card for whichever of the other three is still outstanding.